Saturday 30 June 2012

All gassed up!

Another milestone was achieved today when Nick and Andy commissioned the gas system.  We have opted for a basic gas regulator rather than a more expensive automatic change-over system.  I’m more comfortable with this as it will enable me to monitor the gas usage. Albeit I’ll need to change over the bottles each time it runs out.

Testing the gas system for leaks

The 12v gas ignitors and the fridge are both capable of generating very high voltage “spikes” which might potentially damage the Empirbus system.  In an effort to avoid this the electrical supply for the gas and fridge will be run via a relay. The Empirbus system will control the relay and the 12v will come directly from the batteries via a fuse. 

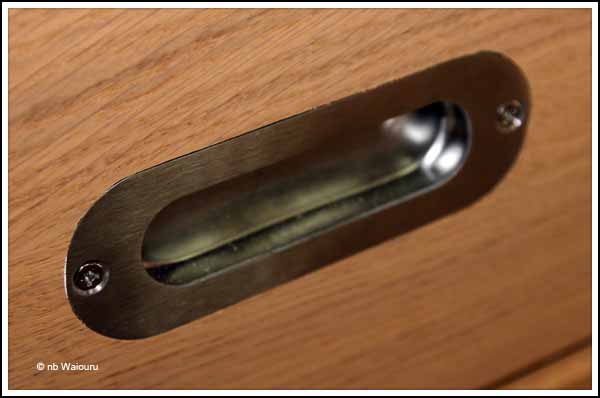
Richard has made an oak mounting block for the Empirbus 8 membrane galley switch.

The switch controls the following:

  • galley lighting (two way)
  • saloon lighting (two way
  • fridge isolation
  • gas electic ignition isolation
  • water pump isolation
  • toilet isolation
  • spare (2)

One of the advantages of the Empirbus system is the spare switches can be used without having to run any additional wiring.

Another of these 8 membrane switches will go in the back cabin on the instrument panel.  It will control:

  • rear cabin light switch (2 way)
  • main 12v isolation switch
  • inverter isolation
  • Hurricane heater isolation
  • LED light switch for the rear steps
  • freezer isolation
  • fuse reset
  • spare (1)

Darren masked up the shower joins yesterday and today Nick sealed most of the joins with a special marine quality sealer.  It’s not silicone based, which would eventually degrade and peel.  This product is far more durable.  It’s grey in colour which has matched quite well with the formica panels.  I was quite impressed with Nick’s attention to detail when applying the sealer and the thorough way he cleaned the shower tray afterwards.

The shower will be finished on Sunday and should be ready to use that night.

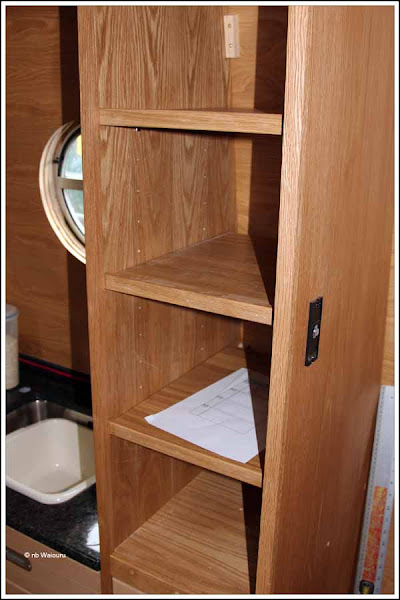
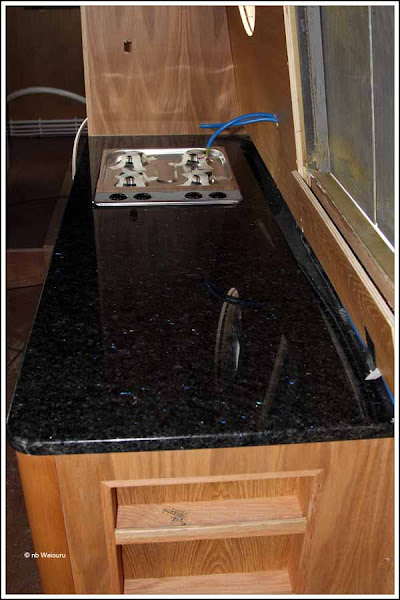
Meanwhile Richard and James have been beavering away in the back cabin.  I managed to take a couple of photos of their efforts when they were back in the workshop cutting more timber.

Photo taken through the back hatch

We now have a new partition which is obscuring the partition between the galley and the back cabin (the panel with the black switch on it).  The compartment between the two partitions is for the workstation and will have a small fold down desk.  The shelf with the screwdriver on it in the photo is where the freezer will go.  The washing machine will be underneath.  The freezer is slightly longer than the width of the washing machine so there will be a narrow compartment beside the washing machine.  No doubt we will find a use for it.  Above the freezer will be a large storage locker.

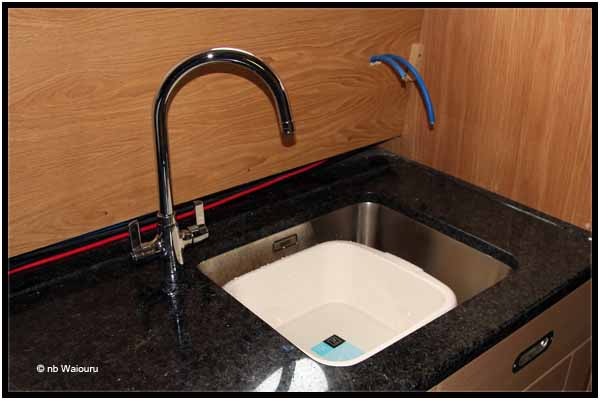
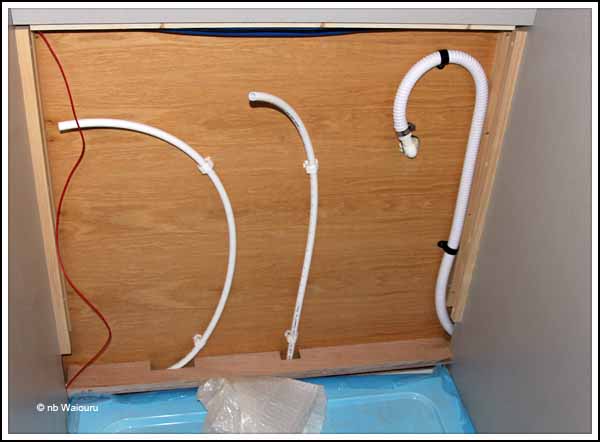
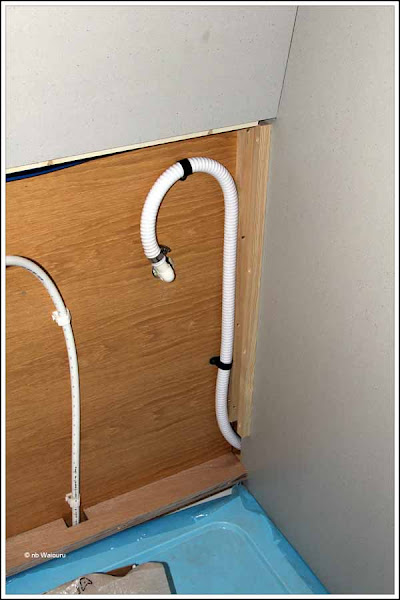
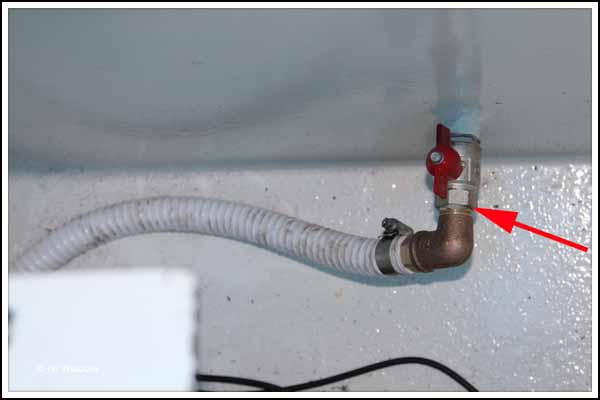
I managed to locate and cut the last (I hope) of the skin fitting holes below the gunwale.  This one is for the washing machine.  After the skin fitting had been installed I made a start on the swans neck for the waste.

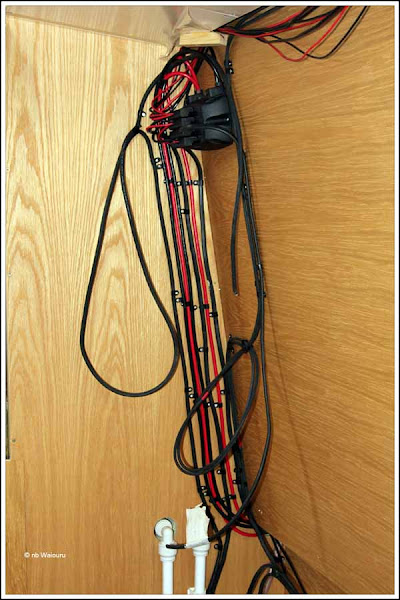
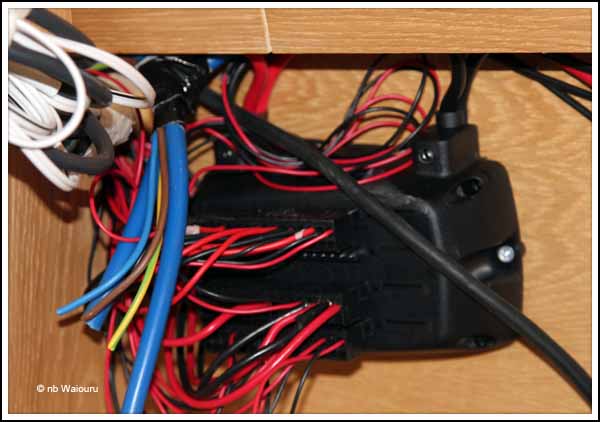
Washing machine cavity

The long (left) loop of cable is for the 240v power sockets that will be mounted high on the wall in the adjacent workstation.  The smaller loop of cable to the right is for the washing machine power socket which will be mounted under the gunwale.

I’ve also been increasing the number of water pipe support clips.  Nick pointed out once we had hot water circulating the pipes would start to sag unless they were supported every 300mm. 

No doubt I’ll find more to keep myself occupied tomorrow. Smile

Friday 29 June 2012

Mark to the rescue

This morning I “bit the bullet” and started wiring the data cable into the Empirbus nodes.  The cable I’d been given by Andy had four cores (2x white, 1x red & 1x brown).  Each core had a coaxial copper screen and there was also a 12 strand tinned copper wire.  Eventually I worked out only the four core were required and I commenced wiring the data cable into the four nodes and two membrane switches.

My heart sank when I reached the last node only to discover the last of the small connection blocks between the node and the wiring was missing.  Without it the system would not be able to be commissioned.  That’s when I decided to telephone Mark Zimmerman of Atlantis Marine who are the UK suppliers of the Empirbus system.  Mark has always been very helpful throughout the planning and build of Waiouru and I was confident he would be able to assist.

His mobile went to message bank however Mark phoned me back very quickly.  Whilst he is based in Southampton, Mark was actually in Colchester on business having left home at 6:00AM that morning.  He had a replacement part with him and informed me he would divert via Waiouru on his way home to deliver the connector.   As it was Mark found me at 6:00PM in the local cafe beer sipping the last of a pint of larger.  We had a good chat and then he had to leave for home.  It was a long day for him and we are most appreciative of the extra time and effort he took to deliver our critical part.

The other work completed on Waiouru today included the masking of all the joins in the shower by Darren ready for it to be sealed tomorrow by Nick.  Andy connected the gas line to the hob and will finish the connection for the oven tomorrow.  That should see the gas system on Waiouru finished.  Richard has made a start on the major joinery in back cabin whilst Jan and I have run the cable for the bow thruster controls and made a start on the power cables from the engine bay to the bow thruster batteries.

Everyone was so busy today there was no time for photos.  Back to normal tomorrow… I hope!

Thursday 28 June 2012

Hot water on demand

After 10 months; today we had hot water on demand.  What a luxury!

The day started with Nick and Mark looking at the water pump.  The unit originally purchased for Waiouru was a combination pump and accumulator.  However it wouldn’t fit in the cavity under the front step which resulted in the need for a different type of pump.

Eventually Nick (the engineer) found a suitable pump in the chandlery.  It needed to be mounted vertically; just like the shower pump on Waiouru.  But the only vertical wall in the cavity is the spray foam lined steel wall of the water tank.  Obviously we couldn’t drill screw holes in the water tank, so I very quickly manufactured a timber bracket which was secured to the baseplate with a very strong adhesive.

Nick plumbed in the pump whilst I made a temporary 12v power cable.  He has carefully left sufficient pipe to allow the fitting of the water tank gauge at a later date.

Nick realised they didn’t have all the required plumbing components in stock which resulted in Mark and me going to ScrewFix at Newbury.  By the time we made it back to the marina Nick had completed the plumbing of the sink.  With the additional components he was able to plumb in the vanity and shower.

He then tested the water system by connecting a portable 12v power pack to the water pump.  For the first time we heard Waiouru’s water system come to life.  I could hear the gurgling of water filling the calorifier and water spluttered from the taps.  Nick was running around checking for leaking connections.  There were two; the pressure relief valve (PRV) was weeping slightly and the seal between the vanity waste and the bowl had a small drip.  Both were quickly fixed!

Whilst Nick was doing this I connected a three pin plug to the calorifier power cable and we then tested the immersion heater.  Twenty minutes later hot water was coming from the taps.

It was great to have Nick working on Waiouru.  As a result we have seen some significant progress today!

Hot water from the tap… What luxury! Smile

Whilst Nick finished the plumbing Richard had made a start on assembling the glass shower door.  I then assisted him to take it to Waiouru and install it in the shower.

It’s a 900mm swing door that pivots at the 250mm point.  There is plenty of clearance which will make it easy to enter and exit the shower.  I asked for the opening end of the door to be on the same wall as the shower rose.  The reason for this is to attempt to keep all the shower water from the rose in the cubical.

The panel below the gunwale needs to be screwed in place and then a start can be made on sealing all the joins.

Richard went on to make and fit the timber battens which will secure the wall oven into the wall cavity.  I must talk to Andy tomorrow about him finishing the gas connections for the oven and hob prior to the weekend.  Unfortunately we have been informed there is a delay with the delivery of the Leesan “Headmaster” toilet.  Apparently it’s due to a quality issue with the bowls which are sourced from a foreign supplier.  Consequentially, it’s likely we will be using a portapotti for a couple of weeks!  A nuisance, but it hasn’t dampened our enthusiasm regarding the progress made during the week.

Wednesday 27 June 2012

Upper Pantry and the Final Node

It was very muggy today with a hint of rain in the air.  After lunch the sheep in the adjacent meadow started to lay down and shortly after there was a brief shower.

The adjustable shelves are now in the upper pantry.  All it now needs is a front cupboard door and some ducting to conceal and protect the cable to the light switch.

Jan has already started to fill the galley cupboards and drawers in preparation for our move aboard on Friday.  Meanwhile I spent all of the day working on the wiring.  I made a start on the stern node after fitting the midships GSM node.

It has been mounted high on the rear port (left) wall adjacent to the cockpit bulkhead.  It will eventually be enclosed in a high level cupboard above the bed.  There is a 3” void across the rear bulkhead so all the cabling will be hidden.  The two large loops of cable are for the connection to the future solar panel controller and the 8 membrane switch.

As you can see the node currently doesn’t have many input and output connections.  All the wiring to the engine compartment has to be installed along with devices such as the rear PIR detector.  However the important connections to the fridge and freezer have been made.  The +/- cables to the battery bank have been run and the node connections made. 

The planned 3” void across the back of the boat has enabled me to run the starboard wiring across to the stern node.

The blue cables are the 240v AC lines for the calorifier immersion heater and the starboard ring main to the plugs on that side of the boat.  The pair of vertical blue cables are for a 240v plug which will be mounted high on the face of the starboard wet locker.

The wiring to the GSM node and the canbus connections between the midships and stern nodes are outstanding along with the temporary connection to the battery bank and the connections to the two 8 switch membranes.  The water pump needs to be installed and the water connections for the vanity, sink, and shower have to be made.  Time is ticking away!

Tuesday 26 June 2012

Pull-out Pantry

The pull-out lower half of the galley pantry has arrived and Richard had it assembled ready for installation as I entered the workshop this morning.  He had already fitted the four plastic feet on the base when I mentioned it seemed a shame to waste the space under the base.  I suggested it might be better used as storage.  Richard then decided to install the pantry without the feet.  This was achieved by screwing the cabinet to the adjacent partitions.

The pantry came with two trays.  It would probably be more useful with three, but the cost of an additional tray is slightly more than £32.  Consequentially Jan has decided to defer purchasing a third tray and instead use the base area for long term storage.

We have two spare galley drawers which wouldn’t fit under the galley sink.  Richard decided we could use one of them under the pantry and the other is already going to be used for the freezer.  The pantry is 300mm wide and the drawer 400mm.  Using the angle grinder I cut 100mm out of the middle of the drawer whilst Richard made a new base and then fitted the drawer under the pantry.

Whilst he was doing that I made a start on the wiring of the midships Empirbus node using the same technique employed on the bow node.

Because there is a void in the wall immediately to the left of the node I cut all the cables leaving plenty of “tail” on them.  This will enable me to tidy the visible cables by pulling the excess back into the void. 

The black and white cables in the top left of the photo are media cables.  The blue cables are 240 volt and the large red & black cables to the right are the heavy duty (16mm) “backbone” cables supplying DC power to the nodes.

The GSM wiring hasn’t been installed so I’ve left the tidying up of the cables at this time.  Tomorrow I’ll fit the GSM node and run the 16mm DC supply cable back to the stern node.  From there the cables will go to the batteries.  I might even get the time to start the wiring of the stern node.

Finally, here is a photo of the other bedside cabinet made by James.  None of the custom made furniture have doors at this stage of the build.

I’ve filled all the visible screw holes with glued oak plugs.  Once the heads have been cut off the plugs the cabinets will get their first coat of varnish.

Monday 25 June 2012

Yet more holes

We were up early and took the opportunity to call my dear old mum back in Perth, Western Australia on Skype.  After an hour of discussing the latest family news we made a second Skype call to Trevor (old family friend) in Adelaide. South Australia.  Trevor reads the blog so there isn’t much I can tell him about progress on Waiouru.

After that it was time for the regular Sunday walk through the countryside.  Jan had some items she wanted from Sainsburys so I decided the route would take me via Tadley where I could stop and do the shopping at the local supermarket.  She had asked me to buy a zucchini.  After walking around the vegetable area all I could see that looked like a zucchini was a cucumber; so I bought one.  Apparently they aren’t the same thing.  Look the same size and colour!  Oh well…… I’ll eat it anyway!

The route was approximately 16km (10 miles) so not all that long.  After all the recent rain much of the ground was very wet with Padworth Common particularly inundated.  In some places it was necessary to divert from the footpath in an effort to avoid the swampy paths.

In the afternoon Jan and I drilled more holes through the hull.  This time it was ¾” holes for the vanity and galley sink skin fittings.  The spray foam is so thick on the shell that I had to use the longest drill I could find in the workshop to punch a hole from the interior of Waiouru through the lining, insulation and steel shell.  Whilst attempting to clear the spray foam from around the hole I snapped the blade off my trusty Leatherman.  I was almost enough to make me weep!  The Leatherman has been my useful companion on backpacking trips through South America, the Middle East and Eastern Europe.  I’ve also used it almost every day when building Waiouru. <Drat>

The technique we have developed for fitting the brass skin fittings is for Jan to hold the fitting flush against the exterior of the shell whilst I slip the washer and nut onto my index finger.  I then push my finger into the skin fitting from inside the boat.  Using my other hand I slide the washer down my index finger and onto the skin fitting.  The same is done with the nut except it’s threaded onto the end of the skin fitting.  By doing this we eliminate the possibility of the washer and nut falling down between the plywood lining and the spray foam.  Once the nut is threaded onto the end of the fitting I push the fitting from inside the boat so it’s proud of the hull.  This enables the adhesive to be smeared around the thread and flange on the face of the fitting.  It’s then pushed back against the hull and the nut is tightened from inside the boat.  Finally, all the excess adhesive is cleaned off the exterior of the hull.

This next photo show a mock-up of the vanity.

The tap and bowl have yet to be fixed to the granite and plumbed in.  However we now have the waste skin fitting installed.

After walking around Waiouru it appears we have one further skin fitting hole to drill.  It will be for the washing machine waste pipe in the back cabin.  However we’re not going to drill that hole until the location of the washing machine is finalised.

Today I remembered we still need to paint the second coat of two pack black on Waiouru.  It might just be a suitable task to do next Sunday when we have the yard mostly to ourselves.

Sunday 24 June 2012

Plumbing and Wiring

The shower plumbing is now 95% complete.  We have opted for a fairly common mixer from Screwfix.  Our logic is should the mixer fail it will be a relatively simple task to replace.

During the past 8 months I’ve noticed the marina engineers have changed a number of shower mixers and I’ve asked them whether a more expensive mixer is an indicator of longer life and reliability.  They tell me this isn’t the case.

When I installed a shower mixer in the house we built in NZ it was mounted to the bathroom stud wall.  It was interesting to observe this mixer is actually attached to the panel.

These plastic press connectors make plumbing so much easier than copper and brass with hemp threading.  I am showing my age!  All that is now required is for the pipe to be pushed onto the mixer connectors and the panel screwed to the wall.

Yesterday I mentioned there was a leak in the joint between the main water tank outlet valve and the brass elbow.  This morning I fixed it by removing the elbow.  The elbow was then reconnected to the valve with plumbing tape rather than the “glue” which had been supplied yesterday.  This time the joint didn’t leak!  Both water tanks were then filled to the top.  The purpose behind this was to test the seal on the hatch in the lower foredeck (cratch) water tank.  The water pressure from the main tank would “test” the silicone seal I’d made around the hatch.  Water started to weep from four screw heads in the rear starboard corner of the hatch.

After tightening the screws only the far right one continued to weep.  It was then removed and the threads coated with construction adhesive before once again being tightened. This time there was no sign of a leak.  The two tanks have now been isolated from each other as a safety measure.  I don’t want the hatch seal to fail during the night and all the water leak into the cabin.  I’ll feel more confident once the cratch automatic bilge pump is fitted and working.

Apart from the PIR (mentioned last Thursday) all the wiring to the bow node has now been completed.  I ran wires for the cratch bilge pump, bilge pump float switch, headlamp, horn and water tank  gauge12v supply.  These are now all connected to the node.

The cables have yet to be tidied

The external wiring will be run under the gunwale in flexible conduit.  The “curled” conduit contains the wire to the bilge pump which will be located in the base of the locker.  I have yet to finalise how the flexible conduit will be secured under the gunwale.  My current idea is to have small metal plated welded horizontal to the inner edge of the gunwale and then drill a hole in the plate.  The conduit could be secured to the plate with cable ties.

The headlamp, horn and camera cables are currently in the bow thruster locker awaiting the welding of the steel post on which the components will be mounted.  My plan is to run the wiring up inside the post.  There should be sufficient room in the holes I’ve drilled through the bulkheads for the bow thruster battery charging and control cables.

Saturday 23 June 2012

Granite has been installed

I must thank Alf for the comment he left regarding the position of the Whale Gulper shower waste pump.  He mentioned it was installed the wrong way up!  I had no instructions when the pump was installed.  After receiving Alf’s blog comment I searched Google and found a copy of the instructions. The pump must be at the bottom when the unit is mounted vertically.  Reversing the installation was the first job of the day.  The motor is now at the top and the pump at the bottom.

Later in the day I finished installing the shower waste outlet pipe.  It has a “swans neck” in an effort to ensure water can’t run back down the pipe from the outlet on the hull.

The lower formica panel already has the shower mixer valve attached.  All that remains is for the hot and cold pipes to be attached to the mixer connections.  The panel can then be screwed into place and the shower cabinet joins sealed.

Two fellows from Stone Circle arrived with the granite bench tops just after 9:00AM.  It only took them a couple of hours to fit all three bench tops.

You may be able to see the bright blue fleck in the granite.

Jan had the entire granite top rebated by 10mm on the sink side leaving a small lip around the outer edge.  The theory is the bow will be higher than the stern so all the water will drain back into the sink when draining the dishes.  She didn’t want drainage grooves routered into the top as it might reduce the useable bench space.

All the plumbing fittings can now be installed.

Richard trimmed the galley cabinets which allowed the gas hob to fit into the granite top.  We were pleased the drawers still fit under the hob which means more storage.  He then started to mark out the back cabin. 

Meanwhile James continued with the bedroom cabinet.

Towards the end of the day I decided to connect the two water tanks with the fittings received from Aquafax.  The inlet to the second tank which is located under the cratch, is in a very confined position.  Moreover it appeared the threads were rusted.  It took me quite some time to clear and clean the threads.  Thinking through the installation process it was quite clear the valve; hose tail; and hose would all have to be assembled and fitted as one component. 

Looking down into the bow thruster locker with the arrow pointing at the valve into the cratch water tank.

The valve, elbow and flexible hose on the other end all needed to be installed separately.

This was a relatively straightforward task and yet I managed to get a leak in the connection between the elbow and the valve (red arrow).  I guess that means I have to pump out the water tank and remake the leaking connection.

The courier still hasn’t delivered the TV bracket ordered from Amazon.  That’s three failed attempts!  Richard has now changed the delivery address so hopefully it will arrive over the weekend.  We need it to establish the positions for the Empirbus nodes as they will be fitted in the same cabinet around the bracket.

Friday 22 June 2012

The noisy green thing is out of its box!

This morning Nick and Darren took the top off the large cardboard box in the workshop to reveal this….

The marina forklift was then used with a jib attached to the blades to under-sling the engine and move it above Waiouru’s engine compartment.  It was then lowered into the compartment using a block and tackle.  All this was to confirm the layout of the other major components.  After they had marked the location of the engine mounts the engine was removed from Waiouru and taken back to the workshop.

Nick and Andy also discovered the drive shaft and Python Drive will not fit into the stern gear hole.  Apparently the hole is from Vetus and 30mm in diameter, whilst they had purchased a standard 1½” shaft and Python Drive.  Both of which now have to be returned and new 30mm components ordered.

Aquafax made a delivery at noon which enabled Nick to fit the 1000W immersion heater into the calorifier.

He has used the “shadow board” I fixed across the rear bulkhead to run the water pipes between the calorifier and the Hurricane heater.

No doubt there will be more pipes and wires fitted to the board!

Much of my day was taken wiring the Empirbus bow node.  The first task was to separate the cables into input and output modules.  When doing something for the first time I always start with the easiest task so you build up your confidence.  I started with the input wires as they are thinner (bottom module).  The output wires were done last.

A number of wires remain to be installed (horn, headlamp, bow bilge pump, etc).  The wiring diagram also had two connections for the PIR.  That had me “stumped” as I wasn’t sure what the bow PIR was?  Made a fool of myself asking Andy who informed me it was the Passive Infra Red (PIR) detector for the burglar alarm.  There is one at either end of the boat.  No…. I’m not going to photograph the PIR and put it on the blog…. I just look silly!

I’ll wait until all the wiring has been connected to the bow node before I tidy it up.

The Aquafax delivery also contained the various pipe fitting Nick ordered last Sunday.  The 2” skin fittings for the engine exhaust and the micro-filter have now been fitted. I know because I have the construct adhesive over my hands and on my nose where I scratched an itch!  I then fitted the sanitation hose between the blackwater tank and the pump-out connection on the roof.

The second hose dangling towards the front lower edge of the photo is the connection between the tank and the micro-filter which will be fitted under the gunwale.  This will allow the blackwater tank to “breath”  The plan is to avoid bad breath! Smile

I’d like to see the plumbing for the shower finished tomorrow and perhaps also install the water pump.  The fittings have arrived to connect the two water tanks so that’s another task for completion.

Thursday 21 June 2012

Starting on the Ducting

Richard and James were away today on other business and the marina was also light on staff.  This let me have the interior of Waiouru to myself.  Where to start?  I decided to tidy up the wiring in the starboard (right) bedroom wardrobe.  The bow node had been fitted under the gunwale in the wardrobe so sorting out all the wiring to the node seemed like a good idea.  The white plastic box section ducting was very useful for channelling and retaining all the wires.

A better view of the node under the gunwale

I guess it will be me who connects all the wires to the modules and then inserts the modules into the node.

Having tidied up the bow node wiring I moved on to the midships node located in the TV cabinet where I separated the media and data cables from the 12v and 240v.  The next job was to fit all the canbus switches we had purchased from Clipsal whilst living in Australia.  These had subsequently been kindly modified to work on 12v DC by Mark Zimmerman at Atlantis Marine.

The switches will work, however the decorative cover plates will not be added until after the final coat of varnish has been applied and Waiouru is almost complete.

By now it was getting towards the end of the day and I was looking for another small task to do.  The chandlery had one shower pump in stock so I installed it under the head of the bed and connected the hoses.  I just need to find a strip connecter for the wiring and the pump side of the shower will be complete.

The pump was mounted vertically for no other reason than there was insufficient width in the compartment to fix it horizontally on the floor.

Meanwhile Nick spent his day in the engine compartment plumbing the calorifier.  It looks a very neat job.  I must remember to take a photo tomorrow.

We have received some rather bad news regarding the granite.  First the supplier phoned to advise they were going to deliver and install all the bench tops today.  That created a slight panic as it was just Nick and me on site.  Then they phoned back to say the bench tops had been involved in an “incident” and as a result they needed to make two new tops which would now be delivered on Friday.

Wednesday 20 June 2012

More on the Galley

This morning Richard asked me what part of Waiouru should we start today.  I suggested the galley.  Based on our experience whilst living on nb Ufton Jan had already decided she didn’t want knobs or protruding handles on any of the doors or drawers.  This was because the knobs on Ufton had snagged on trouser pockets and belt loops.  She wanted flush mounted handles.  Richard had done some research and suggested a brushed stainless steel handle which Jan had quickly accepted.

Poor Richard had made a job for himself as the handles have to be rebated into every door and drawer on Waiouru. He made a template and then tested it with his router to ensure the handles were an exact fit.  Once this had been done all the gallery cupboard doors and drawers were routered using the template.  The handle was tested against each door/drawer and then routered a second time to achieve the required additional depth. 

Meanwhile I was grinding the ends of the supplied stainless steel screws as they were slightly too long.  The handles were then fitted to the doors and drawers.  Drawer handles horizontal and cupboard doors vertical.

A very snug fit

After fitting all the handles we headed back to Waiouru to fit the cupboard doors and drawer ends.  The two drawers at the far end are false because the top contains the sink.

Richard has already checked the depth of the gas hob which will be fitted on the opposite side. There is approximately 50mm of clearance between the top of the granite workbench and the top of the drawer.  This is sufficient to fit the hob without fouling the drawers underneath.

Just as Richard was thinking of taking a rest I suggested we carry on and fit the six kickboard drawers. Smile

We are now waiting on the granite bench tops before finishing the galley.  Meanwhile James has continued with the second bedside cabinet whilst Andy took delivery of the Empirbus components sent by Atlantis Marine (thanks Mark!)   Explaining the purpose of each of the Empirbus components will be the subject of a later post….. or more likely posts as it’s a very complex subject to describe!

Just me working on Waiouru tomorrow.  I need to install a second run of plastic ducting under the starboard gunwale for the extra cables and will also make a start on re-labelling the ends of all the wires ready for them to be connected to the Empirbus nodes.