Saturday 24 November 2018

It wasn’t a success

You may recall I had realised the rear lights on the left side of the trailer was going to foul the modifications to the tailgate.  The light mounting bracket needed to be set back by 40mm.  Well I completed the modification only to realise the light would still foul the tailgate once the spare tyre was fitted.  I’ve removed the mounting bracket and will fill in the three original holes.  At the moment one of them has a rubber bung in it (left over from the fitout of Waiouru) and the other two are covered in masking tape.

IMG_3126

I’ve decided to relocate the brackets higher on the trailer.  The side effect of this is there will be a need for more extensive rewiring.  After drilling the first set of holes the area was masked and spray painted with galvanized paint.

IMG_3127

The bracket and light were then fitted.  I also removed the light on the opposite side.  As you can see in the photo below, I decided to remove the timber lining glued to the inside of the tailgate.  It was chipboard and might start to expand with water absorption.

IMG_3128 The opposite side was then drilled and painted

IMG_3129 

The drilling of these holes turned out to be more complicated than I’d anticipated as the area was double skinned and I partially struck and internal box section.  I also ran out of cable so the internal wiring has yet to be completed.

IMG_3130 


Don my mother used to tell me stories about her driving me as a toddler (65 years ago) from Waiouru to Napier over the “Gentle Annie” in my parents Ford Poplar to visit her family.  In those days the road was unsealed with the numerous streams either crossed using a ford or a timber suspension bridge.  Jan and I retraced the route in 2010 discovering it was 85% sealed with concrete bridges,  Obviously there have been many improvements in the last 63 years!

Jenny, I never told Jan and gave the appearance of being supremely confident! Smile

Catherine I assume you went via the northern route through the Messenger Tunnel?

Friday 23 November 2018

The Hobbit’s Hole

I’ve been reading Marilyn of nb Waka Huia most recent blog post about her early life family holidays in Tongaporutu, north of New Plymouth on the west coast of New Zealand’s north island.  Whilst Jan and I never lived in New Plymouth, we did make one visit when my father was working there on the Maui Gas Project.  By then I had left home, married, had a daughter and we were living at Waiouru Military Camp in the middle of the North Island.   We decided to visit my parents and younger siblings for a brief holiday.

New Plymouth is almost due west of Waiouru and, with no research, I packed our small family into our 1967 Vauxhall Viva setting off after work one Friday.  Well I didn’t take a map (OK I’m a fella) and the journey turned out to be very long.  I was to discover there is no direct route west.  Actually the terrain is exceptionally rugged.  What I should have done is gone south to Wanganui and then NW to New Plymouth in a large semi-circle using major roads.  No map and no research; we headed west reaching Raetihi where the road further west was a dead end.  I should have turned south, but instead went north.  We continued north (what seemed like a long way) looking for a road to the west. Eventually reaching Taumaranui where I noticed a signpost on a road roughly heading west. 

Never having been in this area before, I turned onto the road marked State Highway 43.  Little did I know this is the only unsealed State Highway in NZ.  Event today, some 45 years later some of it is still unsealed. 

By now the light was fading and the fuel gauge was reading half full.  Little did I know I’d taken us onto “The Forgotten World Highway”.  Wikipedia describes it “The road passes through small towns such as Toko, Douglas, Te Wera, Pohukura, Strathmore, Whangamomona, Marco, Koruatahi, Tahora, Tatu, Many of these are ghost towns are from the railway days.

Driving the narrow and winding highway takes up to 3 hours, as it passes through rugged countryside. It climbs three saddles: the Strathmore Saddle, Whangamomona Saddle, and Tahora Saddle.”

As darkness fell the vegetation appeared to menacingly close in on either side.  An unsealed lonely road in the middle of nowhere.  With some trepidation I watched the fuel gauge steadily fall. 

waiouru2newplymouth

Right arrow – Waiouru.  Left arrow – New Plymouth.  Centre arrow - Taumaranui

We didn’t see another vehicle the entire time and there were no lights from towns or farms.  Eventually we found ourselves driving through low cloud with the ever present ferns and trees crowding around us.  I then became very concerned when the mouth of the Moki Tunnel appeared in the vehicle headlights.  I’d never seen a hand cut and unlined road tunnel.

moki tunnel SH46

Photo from Google

Locals refer to it as “The Hobbit’s Hole”.  45 years ago the road surface wasn’t sealed and there was no timber bracing in the roof.  Apparently the tunnel was dug in the 1930’s using two power jack-hammers driven by a coal-fired steam compressor, which was situated at the western Tahora end of the tunnel. The spoil from the tunnel was carried out by horse and skip on steel rails that had been laid from the tunnel to the tip face.

sh46 By now I was starting to become very concerned about running out of fuel.  Fortunately there was a small, but closed, general store at Whangamomona.  I was able to rouse the owner by knocking on his door and he kindly unlocked the sole pump allowing us to refill the car.  Eventually we reached Stratford (and civilization) around 1am.  Needless to say we didn’t use the same route on our return journey.

Wednesday 21 November 2018

No wiring diagram

The metal front panel for the distribution box was marked up last night and I went on to drill holes in each of the cut-outs for the jigsaw blade before finishing for the day.  This is what it looked like.

IMG_3120 

This morning the cut-outs were all made before giving the panel three coats of galvanized primer followed by four coats of Hammertone Dark Grey.
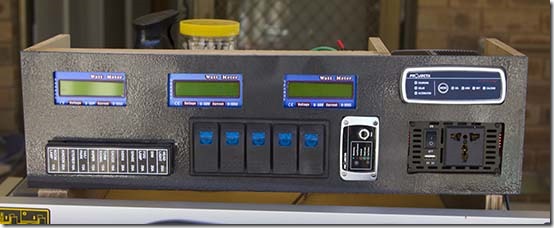
IMG_3124

Test fit

I have a problem with the fake Carling type toggle switches.  As you will be aware I’m trying to do everything on the cheap and I bought the five switches from China for less than the price of one genuine Carling switch (Albeit Carling probably make their switches in the same Chinese factory)
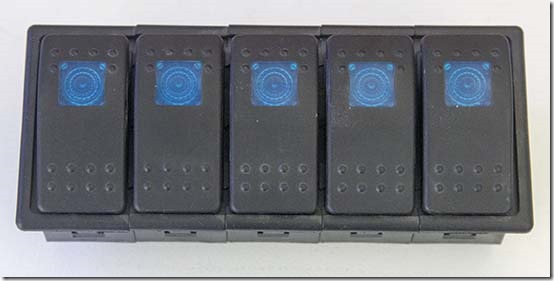
IMG_3121

Each switch has an LED that illuminates when the switch is in the ON position.  My problem is the reverse of the switches.

IMG_3122

Four terminals and NO wiring diagram.  This is going to be a trial and error part of the project. 

Much of the remainder of the day was spent making up some of the wiring loom.  I don’t want to buy cable so I’m scrounging it from various old cables in the garage. 

By 3pm I’d decided to make a start on the tailgate hinge modifications.  At the moment the hinge mounts only allow the tailgate to open 90deg.  But I want it to open 180deg.  so some modifications to the mounting brackets were required.  The trusty Aldi angle grinder proved to be very useful.

IMG_3125

The back was cut out of each mounting bracket (red arrow).  This obviously weakens the bracket so I’m going to weld a small triangular strengthening gusset above and below the mount.    You might notice the round combined indicator and brake light in the above photo.  It needs to be moved otherwise the tailgate door will strike it when open.  Actually I made a start on that until the flies drove me inside. 

Mike if I wanted to be a conspiracy theorist I'd think there was something suspicious about appointing two Brexiteers as the Brexit secretary and then undermining both by having the real negotiations conducted by a Remainer behind the scenes.

I suspect the Conservatives are the party of "Big Business" and the majority of "Big Business" wants to remain a member of the EU. The government then wastes valuable time resulting in an awful deal and now no time to negotiate anything else.

The Irish border was a good negotiating strategy from the EU perspective resulting in the UK going on the defensive. My negotiating strategy would have been to tell the EU the UK isn't going to have a hard border and from the UK side the status quote will remain. That would force the EU (and Irish government) to decide whether they were going to have a hard border (and take the heat if they went down that route).

Actually I'd have taken the Canada FTA and replaced Canada with UK in the document adding a small supplement for the additional issues. But then neither the EU nor the Remainers wanted a simple solution. Meanwhile many of the Brexiteers went along with the situation hoping the UK would crash out.

Jim I agree the UK did have a good deal with the EU. It just wasn't good enough for the majority of the voters in the referendum. IMHO Partially because the EU isn't very democratic and partially because for years UK politicians have always blamed the EU when it suited them.

You say "In today's interconnected world no country, especially a small offshore island, can ever be in charge of its own destiny". Yet I can immediately think of one small island nation who had its EU style economy severed by the larger partner. It suffered for several years whilst the nation adapted created new markets and alternative free trade agreements. Today it is thriving... It's my country of birth, New Zealand. Cut off by the UK when the latter joined the Common Market. 

Mick I doubt there will be an early general election. The Conservatives may change their PM but they won't want to place their control of the government at risk. A new PM is likely to be more pro-Brexit, so a 2nd referendum is unlikely.  I can't see the current deal passing parliament.  Leaving without a deal is the more likely occurrence. One would hope Liam Fox has had his skates on during the last 18 months and there are plenty of free trade agreements waiting to be signed. As for live-aboard narrowboats. Well you won't have to worry about the EU rules on red diesel Smile. It might actually get cheaper should the government decides to encourage the nation to be more self sufficient and innovative in food production.  NZ is mountainous so any narrowboat would need to be capable of white water navigation!

Monday 19 November 2018

I’m bemused

Sorry, I can’t but help it be bemused by the latest BREXIT news.  How did No10 manage to make such a mess of the negotiations.  The proposed arrangement appears to be a combination of the worst of the “remain” or “crash out” options.  One could argue the EU is being consistent.  David Cameron unsuccessfully attempted to win concessions from the EU which would satisfy the UK public.  However there wasn’t much in the way of substance to the concessions and he went on to lose the referendum.  Now the EU appears to have done the same to Theresa May. 

The news here is UK polling suggests the majority of voters have had a change of heart and would vote to remain should there be a second referendum.  Is the UK going to be like the Danes and Irish and keep holding referendums until they realise they have to give the right answer. Smile

My instincts tell me Theresa isn’t going to survive and the current ‘deal’ won’t get through Parliament.  It’s all rather interesting.

Yesterday I visited the local hardware store and purchased a small sheet of thin mild steel.  I had intended to purchase aluminium, however it was just too expensive to waste on a first attempt at making the front panel for the trailer power distribution board.  The aluminium would have been easier to cut but I’m going to persevere with the steel.  I plan on cutting the steel with a jigsaw and realised this would likely rip and tear the metal.  So I decided to strengthen the thin steel plate by gluing a piece of 4mm plywood to the back.  Not wanting to waste money on a quality glue I opted to use some of the left over carpet adhesive from the 4x4 project.

IMG_3116

The plywood on the reverse of the metal sheet

Before I can commence cutting I need to mark the ‘cut-outs’ on the steel.  Lead pencil doesn’t work.  I’m now looking for a fine tip permanent marker pen.  However I’ve also had another thought.  I should make a template from 4mm plywood first to test my panel theory.

This next photo shows the distribution box with all its components

IMG_3117

I then measure and marked a piece of 4mm plywood before cutting out the panel

IMG_3118

Finally a test fit in the trailer locker

 IMG_3119

Some minor adjustments to the plywood template are required and then I can attempt to cut out the final panel.

Friday 16 November 2018

Slow Progress

The trailer project has been moving very slowly.  I attribute this to the heat and patience.  The temperature during the last few days has exceeded 30C and who wants to work under a metal roof in those conditions!  Jan has been inside cuddling the air condition whilst simultaneously complaining about the heat.  The air conditioning unit loudly rumbles on the roof, which probably isn’t surprising as it’s approximately 33 years old.  Now is NOT the time to replace it.  The price of air conditioning repairs or replacement skyrockets in these conditions.  It will have to last until next winter when the air-con companies will be desperate for work and price accordingly.

My patience with the trailer project is a mixed blessing.  A decade ago I’d have rushed in making many errors but completed the project quickly.  Now I find myself working very slowly thinking three times and measuring twice.  That’s the positive aspect.  The negative is the sands of my life are slipping away.  I need to get this done and start using the trailer.

Over the last few days I’ve been working on the 12V power distribution box.  After some thought I decided it needed to be constructed in a removable box.  Hopefully this will make it easier to install or remove for maintenance.  I’ve settled on the layout.

The three power meters go across the top.  They are for:

  • Power into the battery from the vehicle via the DC-DC charger or from the 240V charger.
  • Power into the battery from the solar panels
  • Power from the battery to the consumables

In the top right is the Projecta combined DC-DC charger and MPPT solar controller.  Underneath it is a cheap 1000W 240V modified sine wave inverter for charging camera batteries, etc.  Below the right Watt Meter is the battery cut out regulator which will disconnect the battery should the voltage drop below 12.2V.  This is to protect the expensive AGM battery.

Below the Watt Meters will be five switches for consumables and a fuse box.  The plan is to make a front panel from a piece of sheet aluminium

IMG_3114

In the base is a threaded stud on a dark red mounting block.  This is the main positive connection.  The black block with the clear plastic top is the negative busbar.

IMG_3115

Tuesday 13 November 2018

Blogger Visitors

There wasn’t much done on the trailer project yesterday as we had interesting visitors.  However I did manage to do some sharpening with the oilstone in the morning.
Jan had been using the paint scraper to remove the sun tint film off a couple of the bedroom windows and it was now blunt.  I imaging most people replace these ‘Stanley’ blades, but I can get more life from them by resharpening.
IMG_3112
Jan had also mentioned the circular blade on her electric bread slicer seemed to be blunt.  Probably not surprising as its sharpened hundreds of loaves she has baked.  Anyway,  the blade also got the oilstone treatment.
IMG_3113
Later in the morning Di and Fraser arrived.  We first met this interesting couple at Evesham when cruising the Avon.  On that occasion they arrived bearing freshly baked scones, which went down a treat.  Di is a Kiwi and Fraser hales from Canberra.  Somewhat like us; they’ve done quite a bit of moving around and currently reside in Canada.  They have an interesting blog <link here> and have also been bitten by the narrowboat bug! 
We had a great afternoon discussing past and future plans over a BBQ lunch.  I managed to undercook the chicken and over cook the sausages, so on average everything was OK!  Yes, I do need further training.  Hopefully that will be rectified when master BBQ’er George (of George & Carol – WB Still Rockin’) visits Perth in the New Year.
Now this next observation will astound narrowboaters…… The subject of toilets was only raised once!
All too soon it was time for them to head back to their accommodation leaving us rather envious about their future canal cruising plans.

Monday 12 November 2018

Plan B

Why does Plan B always have to be more complicated than Plan A?   Probably because you’re setup for A and B doesn’t quite fit.  Anyway, Plan A had to be discarded today.  The trailer kitchen paintwork had dried in the hot summer sun which meant I could fit the two burner stove.  It’s going to be permanently mounted in the kitchen which meant it had to be disassembled.  Not knowing how it had been assembled on the production line resulted in me disassembling it more than was required <grrrr>.  Once I’d been able to access the interior I drilled a hole through the metal base near all four corners in order to screw it to the kitchen. 

IMG_3105

Base of stove about to be fitted

That’s when I discovered in shortening the kitchen (to fit through the tailgate opening) the gas hose now wouldn’t fit down the hole I’d made.  I needed to do some lateral thinking and came up with Plan B.  The gas hose would be routed through the side of the kitchen instead of the base.  There should be sufficient room between the side of the kitchen and the trailer wall when the tailgate is closed.

IMG_3106

New round hole on the side

The base of the stove was then screwed to the kitchen (Holes ‘A’ below).  Then I started reassembling the stove.  That was almost completed when I realised the two burners had been secured with screws through the base of the stoved. 

IMG_3108

This meant the top of the stove had to be reassembled before it could be secured to the kitchen. 

IMG_3107

After several minutes of thinking about the conundrum I settled on a modification to Plan B.  I drilled holes though the kitchen panel that lined up with the holes in the base of the burners.  Then I replaced the original short fixing screws with longer screws.  This means the stove is now secured by four corner screws and the two for the burners.  It will probably add to the strength of the mounting.

IMG_3110

The mounted stove

IMG_3111

The kitchen closed for travel.

The kitchen hasn’t been properly mounted on the tailgate as I’ll need to remove it to modify the tailgate hinges.

Sunday 11 November 2018

Planning for a visit

We have fellow bloggers arriving for a BBQ tomorrow.  Jan suggested fresh strawberries for dessert, so this morning we set off before the heat and the crowd.  Actually the strawberry farms aren’t very far from where we live, which means it’s not much of a chore.

Several weeks ago the industry was hit quite badly when a purchaser discovered a steel sewing needle in a strawberry they had bought.  This made quite a story in the national media which unfortunately resulted in several ‘copy cat’ incidents around Australia.  Tonnes of strawberries went to landfill as the market collapsed.   We have always preferred to pick our own locally.  The supermarket strawberries tend to be colourful, hard and tasteless.  Probably because they are picked early as they tend to travel long distances to reach their markets.  Moreover the chances of finding something ‘foreign’ in them are quite low.

So off to our favour strawberry farm.

20181111_094312

Usually we are directed to a defined portion of the farm to do our picking.  One assumes the grower wants to ensure intensive harvesting occurs.  However it’s now the end of the season and we were told we could pick anywhere we liked.  With few pickers about it only took 20 minutes to fill our large cardboard punnet.

20181111_101157

Frankly we were picking fast in an effort to get the job done and get away from the pesky flies.  Apparently Jan had one which had become enamoured with her ears.  Next year we must remember to take a head net each.

There is only some touch-up painting to complete on the camper trailer kitchen and it’s complete.  I need to get motivated and do more work on the 12V electrical system.  However I’ve run out of solder which is quite disappointing.  The reel of solder we bought in Singapore back in 1981 has all been used.  I can’t believe how quickly it went! :Winking smile

Under pressure from Australian retailers the government recently changed the rules regarding the collecting of GST (VAT) on overseas purchased.  It used to be that any purchase less than A$1000 didn’t incur GST.  However that has recently changed and now GST is collected on all overseas purchases.  The government has made the major overseas retailers collect the GST on their behalf.  So if you purchase from the likes of Ebay, Aliexpress, Alibaba, Amazon, etc you get charged an extra 10% GST.  Now the clever half of our partnership has discovered ‘Joom’, a Chinese retail website that doesn’t collect GST on behalf of the Australian government.

Thursday 8 November 2018

Haircut

The camper kitchen has had it’s haircut.  60mm off the bottom and 50mm of the right side.  As I suspected, afterwards it didn’t look nearly as good as the original build.  After the glue had set it had a trial fit on the tailgate.

IMG_3098

Tailgate closed

IMG_3099

Now open.  Finally, the kitchen fits through the tailgate opening. 

IMG_3100

You might have noticed the bottom drawer is now shallower.  I guess this means it will be the cutlery drawer.  All the damage from the modifications needs to be filled, sanded and painted.  However that may not occur today as the mercury has risen to 32C and if I attempt to paint it will dry on the brush as I lift it out of the pot.

Yesterday we were invited down south to Rockingham where blog readers Ken and Elaine live.  They recently purchased a used German made caravan from the other side of the continent.  It took Ken three long days of driving to bring it back to Perth.  It was on the way back that Ken discovered unless the caravan was plugged into the 230V mains, there was no on board domestic electrics and the battery was going flat.  There’s nothing like an interesting challenge to absorb one’s time.  

IMG_3102

After an hour of fault finding it was obvious some else had attempted a ‘work around’ fitting a CTEK 240V mains charger instead of using the originally installed Schaudt Elektroblock.  This is a very sophisticated device combining a 240V mains battery charger, a vehicle battery to battery charger, a solar panel charger and a 12V power distribution system.  The caravan is also fitted with an Enduro 12V caravan mover.  However there was no wiring to this latter device.

We started soring through the wiring gradually fault finding to the point where both devices were finally removed from under the bench seat.

IMG_3104

The battery charger half of the Elektroblock has failed and the last person to work on the caravan obviously decided it was too hard to identify the problem, hence the subsequent installation of the CTEK charger.  However that doesn’t solve the problem of battery recharging when the caravan is moving.  Actually it’s a rather crude solution.

Ken and I went to Jaycars (Maplin equivalent) for a few bits and pieces to reconnect the Enduro.  Once it was all rewired we spent 30 minutes unsuccessfully attempting to get it working. 

IMG_3103

Poor Ken will have to get both units repaired.  However you wouldn’t think by the smile on his face that this concerns him. Smile

IMG_3101

Something obviously caught Elaine’s attention!

This morning I made up a few timber pegs before driving them into the ground roughly where my ‘man cave’ will go.  My co-opted worker (Jan) and I then used my brother-in-law’s laser level (kindly loaned) to level the pegs and run string lines in order that I can accurately level the ground.  Well that was the plan until Molly the daschund decided those nice tight string lines looked great for chewing. <ping> Sad smile

Sunday 4 November 2018

Double Trouble

Why is it that simultaneously two separate things always go wrong?  There is a major problem with the camper kitchen.  It’s too high for the opening!  This is extremely annoying as I have the CAD drawings and dimensions of the opening from the manufacturer.  It appears we have version 3 of the trailer and the drawings are from version 2.  The tailgate has been redesigned.  OK, I should have double checked and do assume some of the responsibility.  The easiest way to fix the problem would be to cut 50mm off the top.  However if I do that then the two burner hotplate stove won’t fit.  So I have to cut the bottom off the cabinet and rebuild it.  The kitchen has been built to withstand the rigours of cross country travel which means any modifications are going to be difficult.

Before commencing the reduction in height I decided to complete a “test fit” to the trailer tailgate.  The damned kitchen is also too long! I need to cut 50mm off one end.  So that was the first problem.

The second problem was the Raspberry Pi micro computer.  I did a firmware update (not software) and the @#$%^&* thing stopped working.  No problem…. I have a backup image.  But that didn’t work!  Not to worry I have a backup of the backup…. But that also didn’t work!  Being a “belt and braces” type I have a backup of the backup of the backup.  Nope…. that didn’t work either.  As a consequence I’ve spent an entire day rebuilding the system from the basics.

Has anything positive happened to us?  Jan won $2 on Powerball.  Please respect our privacy whilst we decide what to do with this windfall!

Oh, a burglar broken into the house the other night.  He was silently sneaking across the lounge room when a voice quietly said “Jesus is watching you!”   Startled he looked around but couldn’t see anyone.  After two further steps the voice repeated “Jesus is watching you!”  That’s when he noticed in the corner there was a cage with a large parrot in it.  Walking over he asked the parrot “Was that you speaking?”  The parrot said “Yes!”.  “What’s your name?” said the burglar. “Clarence” said the parrot.  “What idiot gave a bird such a stupid name?” said the burglar.  “The same idiot that named the Rottweiler Jesus” said the parrot.

Well I’d better go and make a start on demolishing the kitchen.