Wednesday 31 August 2011

Terraced Houses

Rows of terraced houses are not usually seen in Australia.  Two up – two down.  The house we have been living in whilst in Plymouth is actually three stories with two rooms on each floor.  The lower floor is partially below ground level.
Terraced houses in Plymouth
I can understand why the houses in the UK are small and terraced.  Land is at a premium!  However our eldest son used to live in a very old terraced two up - two down house in the Sydney CBD.  You would think that with all the available land in Australia there wouldn’t be any need for this style of house.  My conclusion is the terraced houses were built in Sydney simply because that’s all the immigrant builders knew to construct.  It was only later they started designing and constructing houses for the Australian climate.
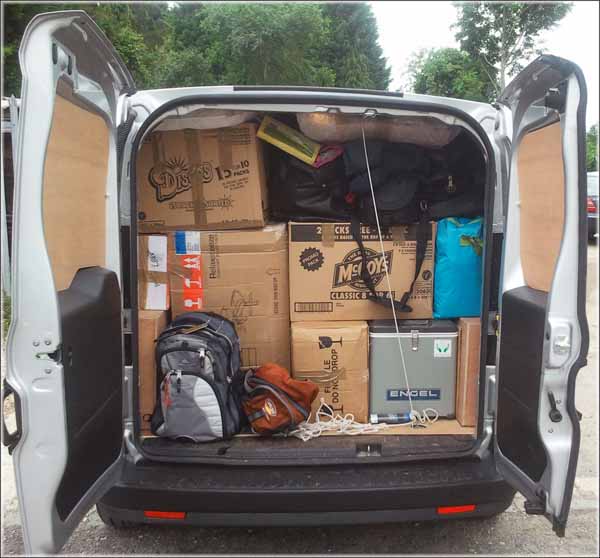
Meantime we have moved.  I booked a small van from Enterprise and then had doubts on the morning I collected it.  Would all our possessions fit?
It was the largest of their small vans.  I drove it back to the house and carefully inspected all our boxes before mentally packing the van.  I hadn’t appreciated just how much we had purchased since arriving in the UK with two suitcases.  We carefully packed the van using all the available nooks and crannies and managed to get everything in.  I was almost surprised….. and definitely relieved!Smile
We are now afloat and settling into our new temporary home.  But more on that later.

Monday 29 August 2011

Foam or Spring?

On average we spend a third of our time in the bedroom doing little but sleeping.  Space being at a premium means our bedroom is small.  However the bed is going to be reasonably large.  King size in the UK or Queen size if in Australia.  Even more importantly; it needs to be comfortable!

Many years ago during the first couple of weeks after leaving home, I slept on a slat bed with a paillasse for a mattress.  For those readers who don’t know what a paillasse is; it’s a canvas covered bag filled with straw.  We then received foam mattresses and I slept on one for the next six years.

When Jan and I married we purchased and inner spring mattress.  I didn’t mind it, but Jan thought it was too hard.  We then changed to a waterbed and have slept on one ever since.  The waterbed is warm and conforms to the shape of your body.  Now we need to think about the type of mattress we will want on Waiouru. 

We are having to be a cross-over bed which will preclude the selection of a waterbed.  Anyway, it would be too hard to heat.  We have to choose between inner spring or foam.  Our builder suggests the former, whilst I’m leaning towards a memory foam mattress.  I suspect they will be more like a waterbed and are probably cheaper.

However I’m open to other opinions or suggestions.  I also think Google with produce some “pro’s & con’s”!

Sunday 28 August 2011

Where is that Supermarket?

By chance I came across a useful application for our Android smartphone.  Whilst browsing through the Android Market I stumbled across “Superstores Locator”.  It’s free, and such a useful application I’ve downloaded a copy to our Samsung phone.

The application uses the mobile phone location to display the nearest supermarkets.  I presume it finds the general location using the tower to which the mobile phone is linked.

It has the locations of the following UK supermarkets

image

The location of the supermarket appears in Google Maps along with your own location (which I think is actually the mobile tower location).

image

You can see the distance to the supermarkets

image

Along with options for getting there

image

It’s rather useful!

Friday 26 August 2011

New Banner

Those of our readers who load and read the actual blog rather than using a reader program such as Google Reader will notice I’ve changed the blog banner.

It was time to move on……. 

Eldest son posted this which bought a smile to my face.

OMG!....I was in in the public restroom - I was barely sitting down when I heard a voice in the other stall: "Hi, how are you?"........
Me: embarrassed, "Doin' fine!"
Stall: "So what are you up to?".......
Me: "Uhhh, I'm like you, just sitting here."
Stall: "Can I come over?" .........
Me: (attitude) "No, I'm a little busy right now!!"
Stall: "Listen, I'll have to call you back. There's an idiot in the other stall who keeps answering all my questions!

It reminded me of something that recently happened to Jan at a pedestrian crossing.  She was standing there minding her own business when someone walked up beside her and said “Hi… how are you?”  Jan though it was another friendly local and replied; “Good!… and you?”

Then she realised the person was talking to themself (which was rather scary) until she realised the person had one of those mobile phone headsets behind their opposite ear and was having a remote conversation with someone else. 

Ah; the wonders of technology!

Thursday 25 August 2011

Yet more toilet system considerations

I’ve been surprised by the number of comments generated by my toilet and blackwater tank posts.  I’d assumed the cassette and composters would have left some remarks about our choice of pump-out but this didn’t occur. 

Bruce (nb Sanity Again) and Peter (nb Kelly-Louise) both made pertinent comments about my plan which had the positive effect of making me re-think the setup.

As Bruce rightly pointed out we would never be able to fully empty our tank and as; at 6”; it is quite shallow and this might mean a significant volume of waste wouldn’t be removed.  He also mentioned potential problems with a complex vacuum macerating system.  Peter also provided some useful information about his own Tecma system along with a copy of the manual.

I started to re-think the location and alignment of the tank but then recalled my earlier correspondence with Chris Wells of nb Belle.  He has a similar underfloor tank and hadn’t experienced any problems.  If we were to move the tank to above floor level then it would take up valuable storage space.  This is the major reason why I located it under the floor and one of the reasons why I specified a 20mm thick baseplate (eliminate the ballast).  I’ve decided to stay with the original underfloor tank.  However Bruce’s comments have made me realise I should consider planning to empty the tank when the water tank in the bow is almost empty.  This will increase the “bow up” trim of the boat thereby maximising the opportunity to empty the majority of the contents of the blackwater tank.

The vacuum system is complex and it has always concerned me I hadn’t identified a location in Waiouru for the vacuum generating system.  My sole reason for selecting a vacuum system was to reduce the volume of required “flushing” water.   Peter’s toilet system also uses very little water and has another advantage.  A powerful turbine pump.  It is capable of pumping to a height of 11m and a distance of 90m.  That is more than we need on Waiouru.  After reading the owners manual he emailed me I realised the toilet was very similar to the one we had on our last Black Prince hire boat.  As a result I’ve concluded Bruce was right about the vacuum system and Peter’s advice regarding his own toilet is the likely way to proceed.  Oh; the Tecma is also cheaper than a vacuum system!

Don’t read any further if you get squeamish about toilet tank capacity calculations and human waste.

Having calculated the capacity of the tank at 400 litres I wanted to know the average number of days between pump-outs.  The proposed toilet has a two flush system.  One for liquid only, and the other for solids.  The technical manual provides the amount of flush water for each cycle.   I can calculate the daily frequency of toilet use by observing our own habits.  Where I ran into difficult was finding a reliable source for the average daily volume of human solid and liquid waste.  I could measure the liquid, but the solids proved more problematic.  There was a wealth of information on Google regarding weight but little about volume. It’s the volume that is critical to the calculations.  Eventually I found a source which provided the answer (0.5565 litres for those of you who want to know).  It then became a simple matter of creating a spreadsheet with the fixed and variable data.  The toilet tank should last a maximum of 40 days between pump-outs.

Wednesday 24 August 2011

The important Blackwater Tank

Some time ago we decided to take the pumpout option when it came to the toilet system.  As storage capacity on the boat will be one of the three critical criteria I opted for a vacuum macerating toilet.  The idea  behind this choice was it would reduce the amount of water used to flush the system. 

After reading some of the technical literature on the subject I became slightly concerned about the distance between the toilet and the holding tank.  The bathroom is near the bow and the tank is in the back cabin.  In the end I reversed the bathroom layout which had the effect of moving the toilet three feet closer to the tank making them slightly over 20ft apart.  Additionally, the tank will be under the floor and my thought was that at least the toilet pump would be moving the waste with the assistance of gravity.

The tank will be only six inches high but cover almost the entire floor space of the back cabin.  We will need to leave some room either side of the tank for bilge drainage.  My rough dimensions are 6’x5’x6” giving a capacity of just over 400 litres.  I’ve calculated 5ft for the width to allow for the start of the curve in the swim.

My idea is the inlet pipe and capacity gauge will be in the forward port corner of the tank and the outlet plus rinse pipe will be in the starboard stern corner.  The trim of the boat should be bow high which means the tank should pumpout to an almost empty status.  I’m not sure at this time whether we will need a baffle plate to reduce the amount of liquid movement when we are underway.  The tank isn’t all that high and a baffle plate may just create an obstacle allowing the build-up of solids in the tank.

The weakest structural part of the tank is probably the top.  My idea is to either weld vertical plate or box steel to it thereby providing some rigidity.  These can also be used as supports for the floor bearers.

I need to talk all this through with the builder.

Monday 22 August 2011

Battery Charging

As we plan to have a large (and expensive) domestic battery bank I’ve been reading about charging lead acid batteries. No equipment lasts forever, but I do want to protect our investment. The first thing I’ve identified is batteries can be damaged if they are discharged more than 50%. Next, it appears recharging can be quite complex. I’m going to explain my understanding of the problem and solution using an analogy. Readers with more experience are welcome to correct me by leaving a comment.

Consider the battery bank to be a water tank. Water (electricity) is drawn off and the tank gradually empties. The tank shouldn’t be emptied more than 50%.

When the tank has to be refilled the water can either be trickled in or poured in under pressure. Obviously the more pressure and volume of water being poured into the tank then the quicker it will fill (with electricity, volts = pressure and amps = quantity). However if there is too much pressure or too large a quantity of water the tank might burst. In a battery the electrolyte can boil, the plates warp or the case split. So too much, too quickly, can be a bad thing. Too little may result in the process taking too long or the tank not being filled to maximum capacity.

However the water tank isn’t an empty tank. It’s actually a tank filled with a sponge. In the initial stages of refilling the tank the sponge readily and quickly absorbs the water. Eventually it will reach a saturation point where it doesn’t matter how much pressure and volume of water you attempt to force into the tank it simply can’t be absorb in that volume or pressure. Nevertheless there are pockets of air in the sponge, so the tank still hasn’t been filled. But if we are prepared to be patient and trickle a small amount of water into the tank it will all gradually be absorbed until the sponge is completely saturated. If we don’t completely fill the sponge in the tank then those dry pockets will eventually become permanently unavailable and the total capacity of the tank will be reduced. This is a cumulative process until the tank is essentially worthless.

So our battery bank is going to need a large amount of electricity to recharge the batteries at the beginning of the process and then a “trickle” charge to complete the final top up. Running the engine and alternators during this latter stage is a waste of energy (diesel). For the top up stage we need to consider either using shore power or perhaps solar panels.  Alternatively, we can accept the battery life will be reduced through failing to fully recharge the batteries.

Sunday 21 August 2011

Winter Preparations

Well the long range weather forecast for the winter is that it will be similar to last year.  So we need to start preparing and have already commenced purchasing additional cold weather clothing to supplement those items we bought with us from Australia.

Whilst we are prepared to buy “High Street” brands, I see little point in purchasing an item solely based on the label.  Our current micro-fleece tops were purchased in Australia and whilst they are warm enough for an Australian winter I don’t think they will be good enough for the UK.  We checked all the local clothing and outdoor stores, eventually finding heavy weight micro-fleece jackets that had been discounted twice down to £50 each.  This still seemed a large sum so I decided to do some internet research on workwear clothing.  You know; the clothing a company purchases for it’s employees.  It’s normally unbranded and may even have a corporate logo.  Whilst it may not be “top of the range” the clothing is usually practical, hard wearing and very reasonably priced.

We found what we were looking for on the Cromwell Industrial Tools website under personal protective equipment.  There is a store in Plymouth which was most useful.  We are finding it is important to actually try the clothing for size as different manufacturers often produce apparel that is labelled the same size but can be physically different.

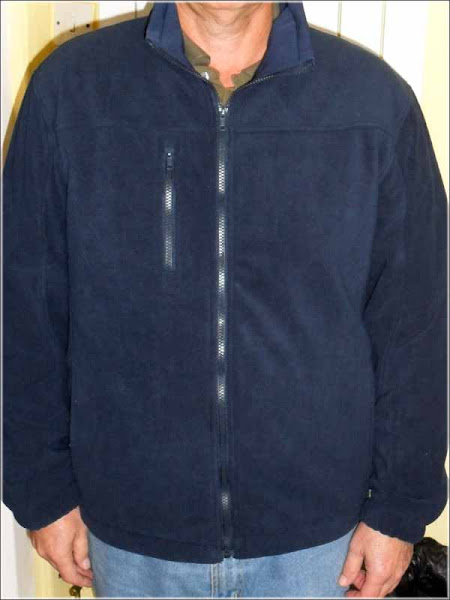
This photo shows the jackets we have purchased. 

They are lined with three pockets, shower proof and wind resistant.  Only two colours – black or navy.  Best of all was the price at £13.18 each.  At that price we can afford to purchase a number of replacements before reaching the cost of a designer fleece.  I also took the opportunity to purchase a boiler suit (overalls) for use when carrying out maintenance on Waiouru. They are made from poly-cotton and were also approximately £13.

Jan is now looking for thermal underwear!

Saturday 20 August 2011

Electrical Audit

I’ve gone back to my original electrical audit calculations for Waiouru and updated them.  This time I’ve created an Excel spreadsheet where the variables can be adjusted.

The spreadsheet consists of four parts.

  • 12v DC consumers
  • 230v AC consumers
  • Actual available domestic battery bank capacity
  • Battery recharging times

I’ve listed all the 12v consumers by type (lights, appliances, pumps, etc); the quantity of each; the consumption in amps; and the average daily usage in summer and winter.

I then did the same with the 230v consumers.  As the electricity will be coming from the inverter I added an additional 10% consumption for the inefficiency of the inverter.

Next I calculated the energy available from the domestic battery bank.  I’ve been conservative and will only discharge them to 30% of their total capacity.  Any more might harm the batteries and shorten their life.

Finally, I calculated how long (in days) the battery bank would last before recharging as required.  Then I used the spreadsheet to calculate the daily hours the engine would need to be run to recharge the batteries in summer and winter.

By creating the spreadsheet with variables I am able to see the results of my “What if…?” ideas.  For example – what if I was to reduce the size of the domestic battery bank?  Or – I will cruise an average of 3 hours daily so how much charge can I generate in that time.  Fully recharging batteries isn’t a simple process so I may have to do more work on this part of the process.

Friday 19 August 2011

Spray Foam Insulation

Our plan is to have a very well insulated boat as we were quite concerned about the cold when living aboard during winter.  To achieve this I specified spray foam insulation on the ceiling and walls with foam insulated panels under the floor.  In order to achieve a thermal shield there must be no gaps between any of the joints.  All of this was explained to Ben Harp. 

We then specified a second layer of insulation.  This product was a double sided aluminium foil with plastic bubble sandwich about 4mm thick.  Well all of this was installed by Ben Harp, but it appear incorrectly.

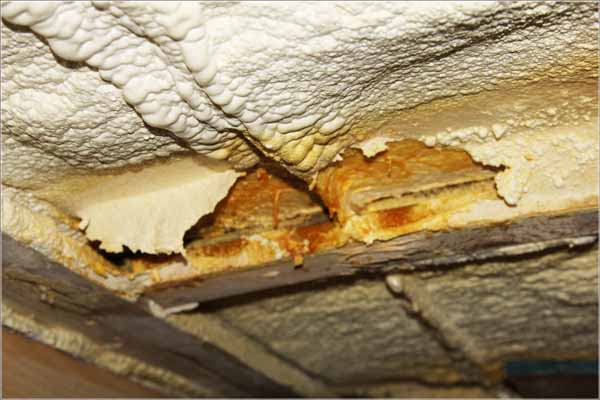
As you can see in the following photo a gap of about 4” has been left between the floor insulation and the spray foam on the wall.  This would have become a cold seam almost negating the effect of the underfloor insulation.  You might also note that the bilge is full of rubbish.  This isn’t conducive to good airflow through the bilge. 

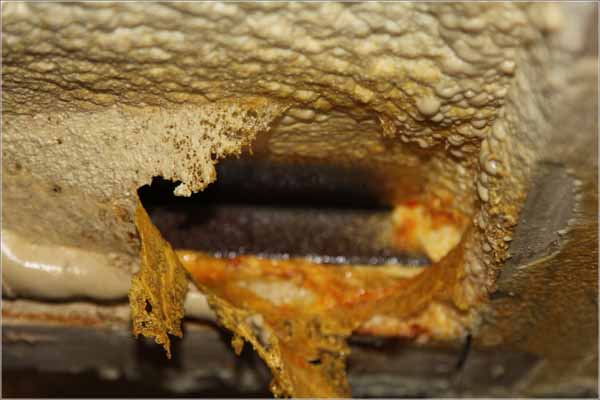
The spray foam has also been poorly applied in places.  There are “blisters” in the foam.  If the foam isn’t correctly applied to the steel an air gap (blister) can form creating a pocket between the foam and the steel.  This creates a cold point inside the boat where condensation will form and eventually rust.  We wouldn’t have noticed this because our plan was to have the secondary bubble foil insulation.  However if the same has occurred with other Ben Harp boats then they may start to notice staining on their ply lining as the situation start to manifest itself.

You can see rust has already started to form inside the “blister”!

Our plan is to now check every inch of the spray insulation and scrap out any further blistered areas before treating and re-spraying them.  We will then install the aluminium bubble foil to double seal the boat.  I’ve been looking on the internet and found a competitive price <here> for the foil.

Thursday 18 August 2011

Boatyard Visit

Yesterday was a long day as we drove to the boatyard so Jan could get her first look at Waiouru since she last saw her back in May when we arrived in the UK.

Jan’s comment was “The photo’s don’t do justice to the real extent of the damage”! 

Obviously there wasn’t much time for me to conduct a detailed inspection when we recovered Waiouru on the 25th July.  Yesterday’s visit enabled us to have a more detailed look at our her and then a discussion with the boatyard on the way forward. 

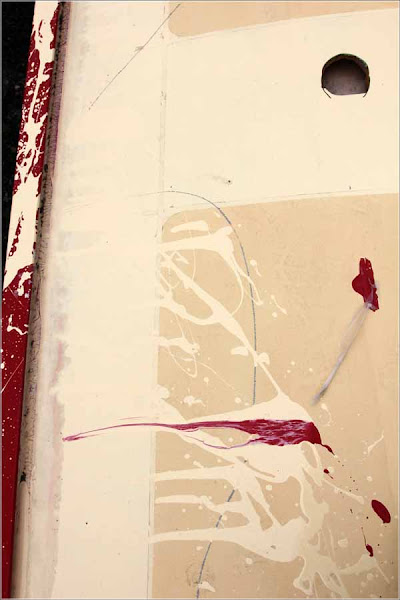
My initial thoughts had been we might be able to save some money if I was to rub down the paint to a standard suitable for repainting.  However the scratches are too deep and some of the spilt paint is very thick and peeling the underlying layers.  Also, the paint on the cabin roof has blistered where the two paint pot that look like they had been set on fire were located.

I’ve placed a couple of arrows to point at the scratches

Heat damage from the paint pots left on the roof?

After talking through the situation with the boatyard we have come to the conclusion that we should accept their suggestion and have Waiouru sand or shot blasted back to bare metal and start again.  It isn’t the cheapest option; but will result in the finish being to the required standard!

We also have a problem with the spray foam insulation which I’ll write about in the next post.

Tuesday 16 August 2011

Mobile Phone Plans

I’m somewhat disappointed with the mobile plans available from UK network providers.

Back in Australia I had a Vodafone “No Plans” for my mobile.  Basically I post-paid monthly for the time I used.  Voice calls cost me A$1.00 per minute and text messages at 25 cents each. Vodafone wouldn’t actually bill me if my current monthly account balance was less than A$5.00.  Presumably because the administration fee didn’t make it worthwhile!  The owed amount rolled over to successive months until I exceeded the A$5 figure.  The plan remained active provided I used the phone at least once every 12 months.

Jan’s plan was slightly different. She had a pre-paid phone and the minimum amount she could purchase was A$5.  The phone plan remained active until either the A$5 was consumed or 12 months elapsed.

Waiouru will have a GSM module connected into the Empirbus system 12v power distribution and management system.  However in order to use the functionality of the GSM module we will need a SIM card and a mobile phone plan.  All the communication between ourselves and the boat will be by Text so what I need is a mobile plan that comes with SIM card only (no handset) and is solely Text.  We aren’t going to be sending many messages to Waiouru so we don’t need many Text messages on the plan.

However I can’t seem to find a UK network provider with a plan that:

  • Is SIM only
  • Text only
  • Minimal number of text messages or PAYG

However there is always a solution to every problem.  My solution is to take the SIM card from my Australian Vodafone handset and use it in the boat GSM module.  As long as I send at least one text message from Waiouru annually the card will remain active.  Moreover, the cost of the text messages is so miniscule that Vodafone Australia are unlikely to bill me more than once each year.  Actually it might be an A$5 bill once every two years!  OK, the text messages between myself and the boat will go via Australia.  However I’ve already tested the speed and despite the distance involved the transmission is very quick.

Monday 15 August 2011

Positioning the Television

There are going to be days and most nights on the boat when we will want to be entertained by the TV.  So what size TV and where to place it.  The difficulty with a narrowboat is they all tend to be long and narrow.Smile

Nearly all of them also have a tumbledown and gunwale.  This means there is almost no suitable flat and vertical surface on which to mount a TV.  Of course I’m referring to modern flat screen TV’s.

If you draw an imaginary horizontal line through the middle of the TV screen then this line should be at the same level as your eyes when seated.  This creates a problem in a narrowboat because it coincides with the gunwale.  Most people appear to either mount their TV either above or below the gunwale.  You end up either peering down or up.  Both can place a strain on your neck. You’re also seated about 4 feet from the screen.

The minimum and maximum screen size is normally dictated by the distance between the viewer and the screen.  If you are too close your eyes may be unable to take in all the data on the screen, and if you’re too far away you also have difficulty seeing the detail.

The following table give some guidelines

  • Screen     Viewing distance range
  • 26"           3.25-5.5 feet
  • 32"           4.0-6.66 feet
  • 37"           4.63-7.71 feet
  • 40"           5.0-8.33 feet
  • 46"           5.75-9.5 feet
  • 52"           6.5-10.8 feet
  • 58"           7.25-12 feet

Given the width of a narrowboat then most TV mounted on the inside of the hull should be no more than 26 - 32”.  We’ve purchased a 32” backlit LCD TV.

We’ve decided to position our TV at the recommended eye level by mounting it in a cabinet that will straddle both the gunwale and the tumbledown.  The cabinet will be at the far end of the saloon.  When viewing the TV we will sit looking down the length of the boat.  This will give us greater distance between our position and the TV.  Obviously we won’t be able to see the TV because it will be a right angles to us.  So we’re going to mount it on an extending swivel arm. When we want to watch the TV we will have to extend it from the cabinet and turn it 90 degrees so the screen is facing down the centreline of the boat.

This does have a drawback.  When the TV is extended it will partially obstruct access to the bathroom and bedroom.  I guess that is one of the compromises we will have to make to get the TV in the best possible position for viewing.  Time will tell if we have made a mistake.

Sunday 14 August 2011

Laundry – Part 3 (A Change of Plan?)


The comments we have received in response to my two earlier posts on washing machines have been quite illuminating.  I had always been concerned about our ability to dry wet laundry within the confines of a narrowboat.  With a width of approximately 6ft (2m) I envisaged the saloon in winter looking like a chinese laundry festooned with ‘large and smalls’ Smile

I think we had become used to the climate in Australia with constant dry and sunny days.  Jan actually pegged out the washing in the shade to prevent the harsh sun fading our clothes. Smile

Eliminating the need for the dryer function opens the opportunity to select a ‘slimline’ model washing machine.  These are approximately 10cm less in depth at about 40cm.  This would make it much easier to fit into the galley or back cabin.  Another benefit is; they are cheaper!

Back to Google, and after some searching I’ve found two potential candidates.

  • Hoover OPHS612  cheapest price £214.97
  • Candy GOFS262  cheapest price £228.86

Both are free delivery and both have a cold wash function.

Actually the controls on the machines look identical.  Probably not surprising as I believe the same company owns both Candy and Hoover. Smile

Sue of nb No Problem kindly sent me a link to her blog post where she described how her cold fill washing machine had been plumbed in using both the hot and cold system on their boat.  Modern washing machines only use about 6 litres of water for the wash cycle but any heating of the water for the washing machine is going to come from our inverter and batteries so it’s well worth considering how to add existing hot water to the machine.  As an alternative, Bruce of nb Sanity Again also wrote on their blog that they have been able to add hot water to their washing machine through the detergent dispenser.  It would appear boaters are quite inventive when it comes to overcoming obstacles!

However in the last few minutes we have just received a comment from Dot & Derek (nb Gypsy Rover) advising they had a Candy Washer/Dryer and it was very successful.  Oh dear…….At least we’re not in a hurry to make a decision!

Saturday 13 August 2011

Laundry - Part 2

After comments from Carol and Peter regarding my last laundry post I started thinking.  I was surprised by the comments about cold washing and why was I attempting to replicate the conventional hot laundry washing done in the UK.  Back in Australia and NZ 95% of our washing cycles were done with cold water.  It didn’t seem to matter which washing powder we purchased – they all worked in cold water!
I must admit, when Jan first started washing in cold water many years ago I had my own doubts.  My grandmother boiled her clothes in a “copper” to wash them.  My mother always used hot water in her machine.  In my single days I also did my laundry with hot water.  I’d obviously developed a belief if laundry wasn’t washed in hot water then it wouldn’t “kill” the germs or remove the dirt. 
How wrong I was!
After some research I read modern washing powders contain enzymes that kill harmful bacteria and hot water actually kills the enzymes.  So these days washing in water over 30 degrees could actually be detrimental. 
Should we use washing powder or liquids?  Powders contain bleaches and are better for washing “whites”.  Liquids don’t contain the bleaches and are considered gentler on coloureds.  Jan has always used powder and I haven’t seem much sign of rapidly fading coloured clothes!
So the situation has been reversed.  Rather that attempting to get hot water into the washing machine I need to consider ensuring the machine doesn’t heat the water. 
However it’s important to note most washing machine manufacturers recommend a very hot cycle once a month to “clean out the system” by removing the scale and other unwanted deposits.  Rather than run hot water through the washing machine Jan would run a cold wash cycle and add “CLR” to the water.  This is a descaling liquid.  I should also mention the water in Adelaide was particularly “hard” which resulted in a reasonably rapid build up of scale.
Oh; after some searching I found a manual on the internet for the Candy washing machine.  Actually the manual wasn’t lost - so I couldn’t have found it!  I was probably the lost one. Smile  Anyway, having read the manual I was pleased to note the Candy has a cold wash option.

Friday 12 August 2011

Laundry

I suspect nearly every live-aboard narrow boater has a washing machine.  It seems an essential item for all but the hardy.  The issue I have mulled over is what functions will we require in the chosen machine.  There isn’t much room on the boat so size is important.  However the smaller the size the less the washing capacity.  Moreover I’m not all that keen on living with wet laundry hanging around my ears.  I suspect it would be hard to dry in winter and significantly increase the condensation within the boat.

So a washer/drier seems to be our preferred option.  Drying is going to increase both water and electrical consumption.  Therefore the more water that can be extracted in the spin cycle the less energy will be used in the drying cycle.  We need to look for a machine with high rpm on the spin cycle.

Then there is the cost.

Most of these machines appear to only have a cold inlet and the water is then heated in the machine.  This too will place demands on our ability to produce electricity.  One option is to consider somehow plumbing the washer/drier so it can take surplus hot water from the calorifier.  For many years in Australia Jan has done cold washing.  We may be able to continue with this practice.

So the essential criteria for the machine is:

  • Washer/Drier
  • Size
  • Price
  • Spin speed
  • Ability to accept hot water
  • Energy rating
  • Water usage

Simple really……

After a considerable amount of trolling using Google and reading various reviews I created a small matrix of potential appliances and then colour coded the strengths and weaknesses of each machine.  In the end I selected a Candy GO4W464 Washer Dryer as our preferred machine.  It never rated any particular strengths but then neither did it rate any weaknesses.  It was “middle of the road”!

Now all I have to do is find a supplier at the right price!Smile

Thursday 11 August 2011

Unique Shell Features

You may recall in an earlier post how I mentioned Ben Harp had informed our solicitor he had sold our boat and that the boat at his premises was a different boat.  Despite having a court order giving us the right to inspect the boat, we were denied access.  During this time extensive work was done to modify the boat.  Eventually, after the court order had been served, our solicitors were informed I would be able to inspect the boat.   My assumption is they believed the boat was sufficiently modified that I wouldn’t recognise it.  We immediately accepted the offer and advised I would be accompanied by the boat builder, Tim Tyler to inspect Waiouru.  The offer to inspect was withdrawn the same day!

Just under a week later, armed with a court order, we were able to access the yard and inspect the boat.  Tim Tyler inspected the boat and confirmed to both myself and the police it was the boat he had built for us. 

I subsequently asked Tim if he would provide me with the unique identifying features that enabled him to confirm he built the boat for us.  His reply was the vessel had the following features:

  • The layout and style of the boat identified it as a Tim Tyler shell.
  • The boat has a 20mm base plate. This is unusual and was specifically requested by us. Tim Tyler Boat Builders has not built another boat with a 20mm base plate during the last few years.
  • The boat still had the unique satellite dome mounts on the roof.
  • The location, size and layout of the portholes and hatches exactly matched those of the vessel Tim Tyler had constructed for us.
  • Some of the methods of construction used are unique to Tim Tyler Boat builders and this made the vessel easy to identify.
  • Because the boat was built on a 2 metre wide 20mm base plate it has an additional fold to the hull side to facilitate its construction.

So, not having a near standard shell was a significant factor in being able to quickly identify the boat as Waiouru. 

Wednesday 10 August 2011

Central Heating in a Boat

I have been having some interesting correspondence with Peter Berry of nb Kelly-Louise regarding narrow boat central heating systems. Peter blogged about it <here>.

Our discussion led to us considering the probable need to ensure the diesel heater output matched the capacity of the radiators. If the output of heater is greater than the capacity of the system to dissipate the heat then hot water will be returned to the heater which may cause it to shut down. Alternatively, if the heater output is less than the capacity of the radiators then the heater might continuously run making the boat too hot. The former might lead to the “coking up” of the burner through frequent cycling whereas the latter is inefficient burning too much diesel.

Peter has a Webasto with an output of 5.2kw. He believes his combined capacity of the radiators on Kelly-Louise is also approximately 5kw so theoretically everything should work correctly.

From what I can understand, his Webasto doesn’t have a thermostat but rather cycles on and off by measuring the temperature of the returning water. I assume a thermostat is built into the burner and measures the temperature of the water rather than the atmospheric temperature in their boat.

We planned on Waiouru having a Hurricane diesel heater and that has a capacity of 7.3kw and I did some calculations on the required capacity of the radiators within the boat.

I’d already decided to opt for finrads; primarily because I didn’t want to use wall space for radiators. The finrads can be placed at floor level. I also wanted small heater panels in the base of the wardrobes to keep clothing dry and warm in winter. My calculations looked something like this:

  • Hurricane Heater output = 7300w
  • Heaters
  • Bedroom Radiators in wardrobes (2) = 1200w
  • Bathroom Towel Rail (1) = 900w
  • Output = 2100w
  • Therefore minimum FinRad capacity = 5200w (7300-2100)
  • Double Finrad capacity per 492mm = 250w
  • Therefore required total minimum length of FinRad = 20 metres

The next problem was to find 20 metres of available linear floor space in a boat that is just over 18 metres long. There is no point in fitting finrads into the back of the galley cabinets, etc. It was immediately obvious the finrads would need to be on both sides of the boat. This has an advantage as it will keep both sides of the boat warm.

So we have planned on finrads in every place where there is open space on the sides of the boat. In addition, I’ve shown a finrad running longitudinally in the storage area under our bed. That will both keep ant thing under the bed dry and warm but also act as a heater whilst we sleep.

I have also considered the consequences of all the radiators being connected on a single ring main. If this were done then it’s possible the first radiator would get very hot working to maximum capacity with very hot water whereas the last radiator would only receive water at a reduced temperature and may not reach maximum capacity. The solution appears to be to create heating zones in the boat; each with their own direct feed pipe from the Hurricane output.

The Hurricane has heating controls for up to four separate space heating zones, each with its own optional thermostat. So we should be able to configure it to maintain different zones of the boat a different temperatures depending upon the time of day.

The 12v DC supply to the Hurricane will be controlled by the Empirbus system. The software program in the Empirbus system will also give us a considerable amount of control over the starting and stopping of the heater. We should be able to send a text message to start the Hurricane if away from the boat and could manage the starting and stopping time of the heater using the timer function within the Empirbus system.

It will be interesting to see if all this theoretical planning can be put into practice.

Tuesday 9 August 2011

Planning for Winter

We’ve always known that as constant cruisers we would be spending winter on the canal. It’s now time to commence some preliminary planning for our first winter.  Obviously our original plan would have seen us on Waiouru throughout the summer and with plenty of time to settle into life on the canal.  However these plans have obviously changed. 

Although we were in Australia during the last UK winter we were able to gain an understanding of the conditions with many boats being frozen in and some stories of burst pipes, etc.

The first thing I want to know was how severe the coming winter was likely to be.  Well it appears it’s likely to be similar to last year <click here>.  Although a Google search threw up a number of sources for a long range forecast they all appeared to be using the information from the link above.

So when living on board we should be prepared for severe weather and probably be “iced in” for some of the time.  I think there are five essential factors we will need to manage.

Fuel.  Whilst we do not intention to cruise during the period we will need fuel for heating along with limited propulsion in order to empty the blackwater tank.

Water.  Another essential.  We must remember to top up the tank on a regular basis just in case the supply pipe freezes (or the canal).

Food.  We will need to ensure we have an emergency supply of food.  Probably a mixture of canned and dry.  We may also be able to count on being able to leave some food in the cratch and cockpit areas where the cold will assist in preserving it.

Waste.  I can see we will need to keep a close eye on the weather forecast to ensure we don’t get trapped with an almost full blackwater tank.  Better to empty it 3/4 full than start going cross-eyed (and legged).Smile

Clothing.  We left Australia with only a limited amount of clothing and there isn’t exactly a great demand in Australia for cold climate apparel.  We need to start buying winter clothing.

I recall when we were living in Singapore how I longed for a cold day!  After 20 years living in Australia it has been quite a while since we experienced really cold weather so in some ways we (perhaps me!) are/is looking forward to the experience.  . However back in the distance recess of my mind is a small voice telling me………. I might regret that last comment!

Monday 8 August 2011

Fort Stamford & Mount Battern Tower–Plymouth

An interesting walk to the eastern side of Plymouth Harbour where I came across Fort Stamfort and Mount Batten.

Fort Stamford was an artillery fort, built 1862-1869 for the defence of the south-east side of Plymouth. Built on the site of a Civil War Fort, Stamford was besieged and captured by the Royalists in 1643. The present fort was built as Fort Turnchapel and designed to cover the gap to Laira, the merchant ship anchorage at Jennycliff Bay on the western side of the harbour, and the north flank of Staddon Fort. An irregular five-sided structure with two single and a double caponier covering the rock-cut ditch. The proposed armament was seven 9-inch rifled muzzle loaders on the two seaward sides, thirteen guns on the land fronts, and six mortars in the salients.   It formed part of Plymouth harbour defences.

The fort remained in military use until 1956, although the armament was probably not modernised after 1893. It now appears to be a country club.

Mount Batten is a 24-metre-tall outcrop of rock on a 600-metre  peninsula in Plymouth Sound, Devon.  It appears to have been site of the earliest trade with Europe yet discovered in Britain, operating from the late Bronze Age, peaking in the late Iron Age and continuing in operation throughout the Roman period.

Later it became an important defensive point for the developing settlement at Plymouth Harbour, providing a field of fire from across the other side of the Cattewater, the channel connecting the old town to the sea. In 1652, Mount Batten Tower, a 30 foot high circular artillery fort was built on top.

The tower is 30 foot high with guns on top guarding the southern approach to Plymouth harbour and was built in 1652.  It is located across the water from Plymouth Fort (now the Citadel) and forms part of the harbour’s interlocking defences. It was designed to accommodate 10 guns on its roof and was in use during the Second World War with two Quick Firing guns.  There was a RAF flying boat base in the harbour beneath the Tower and there are two commemorative plaques at its base.  One recognises the Australian aircrew who operated from the base.

Whilst it can’t be seen from The Hoe, it is possible to see the seaward side of Drake Island from both Fort Stamford and Mount Battern Tower.

Sunday 7 August 2011

Blackberries

Plymouth has a good sized park just north of the main railway station.  It’s aptly named Central Park and I have been walking around it on a reasonably frequent basis.

Image from Google Earth

In the south east corner is an adjacent cemetery.  Actually it’s Ford Park Cemetery and was established in 1846 <click here>.

A few days ago I came upon an area of allotments in the north-east corner.  For non UK readers an allotment is a piece of rented ground used by individuals to grow produce for personal consumption.  I assume this is because most homes don’t have a backyard of sufficient size.

Anyway, the boundary fence around the allotments was overgrown with wild blackberries and they were starting to ripen.  So the following morning I went to Wilkinsons and purchased a cheap (99p) pair of leather faced gardening gloves and then headed for the park with a plastic bag and an empty 2 litre ice cream container.

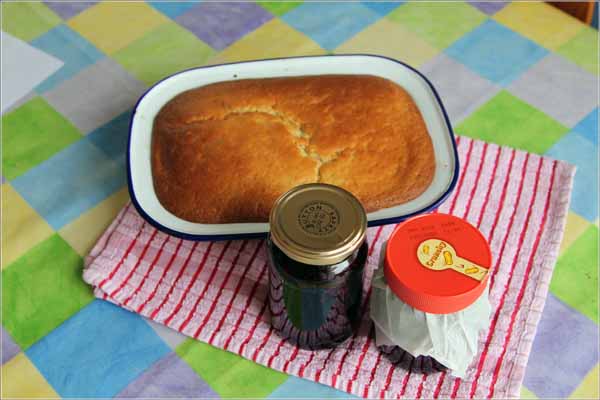
Having done all the hard and dangerous work I asked Jan if she could convert them into something more eatable. 

The jam has a delicious tang (perhaps due to the dogs cocking their legs on the lower berries! - I just added that piece of information so I won’t have to share with Jan).  Actually they are so darned nice I’ve been back for a second 2 litre container and will probably go back for a third and fourth time.  Jan informs me “No more blackberries as we don’t have any spare glass jars!”   However I’m of the opinion the berries can be frozen whilst I attempt to eat the contents of the required number of jars!

Friday 5 August 2011

Doing the Figures

Got the final legal account today (we hope!)

So what has all this cost us:

Boat Stage Payments  £81,000

Legal & associated expenses  £25,000

Boat Recovery Expenses £2500

Total  £108,500

Estimated value of Waiouru before stripping and damage £50,000

Estimated value on recovery £25,000

Loss of £83,500

If Ben Harp had been honest enough to admit he was in financial trouble and couldn’t finish Waiouru; and told us to take her; then he would probably still have a reputation and be in business.  Our our loss would have been £31,000 rather than £83,500.   I guess this is what is called a “lose – lose result”!

We received a further piece of bad news today.  At the end of the month we were going to move to very low cost accommodation (utility expenses only).  We have now been advised it isn’t available.

If anyone has; or knows of someone; who has a boat or caravan they would be prepared to allow us to “house-sit” for 4 months during winter (ie, between 1 September and 31 December) could they please contact us.  All ideas/options will be considered!

Thursday 4 August 2011

Ben Harp – To Hell and Back Again – Chapter 10

Lessons

The “tyranny of distance” attempting to have a boat built in the UK whilst living in Australia turned out to be a major complication.

Another restricting factor was the limited time (two weeks) we had to physically visit builders in the UK and produce a shortlist. If we had been living in the UK we could (and would) have spent more time visiting builders.

We did a reasonable job of reference checking the selected builder with two positive reviews from canal magazines and a glowing referral from a previous customer. However if we had known about Companies House and researched more about limited liability companies we probably would have completed a financial “health” check of the selected builder. This may not have revealed much about Ben Harp Narrowboats as their financial records only show them as trading whilst insolvent from 2009 which is the year in which we visited.

People who get “conned” are either greedy or chasing their dream. We were in the latter category and have accepted our share of the fault! 

We didn’t realise stage payments would be required in advance. Had we known and been in the UK, we would have opted for another builder. But being in Australia and having already waited 15 months for the build to start we decided to place money at risk. Albeit we attempted to minimise the risk by requesting (and receiving agreement) for invoices to be provided to prove our money was being spent.

Whilst the quick build timetable (4 months) provided by Ben Harp pleased us it also meant payments would be frequent. This meant there was little time to take a breath and review progress from a distance.

Employing a surveyor as our UK representative was a sound decision. The surveyor was able to inspect our boat in January when it was under construction at the shell builders. However there were two subsequent failed attempts within the following two months. That started alarm bells ringing about delays to the build schedule.

Some have queried why we made the 4th payment. Well the payment was due on the same date as our surveyor’s scheduled visit and there was an element of not wanting to disbelieve the very positive news being received from the builder. As it was, only half the stage payment was made due to a banking error.

We should have issued a notice of dispute to the builder earlier.  Probably immediately after the failed visit by the surveyor in late March.  This would have given us further legal protection. However at that time we genuinely wanted to help the builder continue in business and complete our boat.  We were also under the false impression he built high quality boats.

A number of people have told us we should have simply employed some “heavies” and taken our boat. Whilst it would have been a much cheaper option - it would have been illegal! Of course we didn’t realise that Ben Harp Narrowboats was going to be so belligerent, ignore High Court orders, lie, modify our boat, and attempt to sell it to another unsuspecting buyer. In the end this wasn’t just another failed business.

At the end of the day we have lost a considerable amount of money to a belligerent, dishonest, scurrilous and contemptible company. Our legal expenses are also substantial. But we can consider ourselves to be honest people. Our readers have already passed judgement on Ben Harp Narrowboats. 

Enough of the negative; there is little point in allowing the small number of despicable and amoral people in society to drag you down……. It’s time to look to the future!

Our thanks go to all our readers who have posted comments or emailed encouragement and support.  There have been so many; and we have been very busy; that it has not been possible to reply to everyone. 

Waiouru has reached her new builder and we will commence the process of rebuilding her. That story is going to occur over a longer timeframe and accordingly the frequency of boat building related posts here on our blog are likely to reduce in the short term.  But I’ve developed a liking for the daily blog, and there is so much of interest in the UK to write about that I’ll probably continue this daily routine.

Wednesday 3 August 2011

Ben Harp – To Hell and Back Again – Chapter 9

The Victims

Our readers might think we are the only victims of Ben Harp Narrowboat Builders Ltd.  Sadly this isn’t correct!

Since we started blogging about our experience a number of others have contacted us and described their own unfortunate experience.  To date we have been made aware of six other victims.  I will not name them but will use their initials and describe their experience.

Victim 1.  D&K.  If you have been reading our earlier posts you will know how D&K have been affected.  I won’t repeat the details because you can read them on their own blog here…… <nb Trudy-Ann>.

Victim 2.  A&C.  They purchased the boat ahead of our own.  The delivery date was late 2010 and they made their “penultimate” payment to the Harp’s in September 2010 (a month prior to our own first stage payment).  However the build dragged on ever more slowly until they finally took delivery in late May 2011.  Progress visits became increasing more difficult to arrange.  On at least one confirmed visit they received a text message whilst in transit stating the appointment had been cancelled.  A similar experience to our own surveyor!  Their boat broke down twice attempting to depart the marina after delivery.  One of these involved the drive shaft parting from the gearbox.  On their second morning aboard, the engine wouldn’t start.  The electrics had been incorrectly wired and the batteries hadn’t been charging.  The system needed to be completely rewired the day after delivery.

The calorifier had to be replaced as it leaked, probably because it hadn’t been plumbed in correctly and was also missing an accumulator.  The plumbing and wiring looks like a “birds nest”.  Additionally, the water pump had to be replaced and a cut off valve needs to be installed for the calorifier.  The bilge pump didn’t work!  Because the calorifier had been leaking there was water in the bilge midway in the boat causing the oak floor boards to cup and curl.  There is no battery for the bow thruster.  The inverter, which had been present on the previous visit, was missing when they took delivery!

A number of the windows leak due to poor fitting.  It is actually possible to see daylight through one of the gaskets where it had been damaged during installation

There is almost no varnish on the timber and little indication sandpaper has been used.  Drawers and cupboard doors don’t fit.

The chimney plate on the roof was loose and letting in water. The diesel tank weld by Ben Harp leaked diesel into the boat.  Plumbing has been so poorly installed that all the waste connections have leaked.

The batteries were installed under the wardrobe and vent directly into it.  Battery acid vapour and clothes do not mix.  Their £250 bathroom tap they purchased and supplied to Ben Harp is missing!

The tiller swan neck was not not drilled and no tiller extension supplied.

They have a similar problem to Trudy Ann with a flange plate for the bathroom hand basin being too close to the waterline – this will have to be moved when the boat comes out of the water.

The boat failed it’s BSS the first time they attempted to take delivery.  But Ben Harp still wanted the £1000 final delivery payment.

Victim 3.  R&J.  I believe they consider themselves fortunate.  Whilst living overseas they booked a slot with Ben Harp Narrowboat Builders Ltd and paid the booking fee after ourselves.  Lack of communication from Ben and Kelly Harp led them to cancel their booking before they signed a contract and they request a refund.  The Harp’s refused to refund their booking fee.   From the Ben Harp Website – ….to secure your build slot a deposit of £1000 has to be placed with us. This is refundable until the contract has been signed and final quote agreed.

Of interest to us was the delivery date given by the Harp’s.  Their delivery date was to be March 2011.  Only one month after our own contract delivery date of February.  Yet at that time the Harp’s we still a long way from finishing the boat ahead of us.  

Victim 4.  DN.   They booked after victim 3 and Ben Harp Narrowboat Builders Ltd placed an order with a shell builder for the construction of their boat shell.  When the shell was completed Ben & Kelly Harp had DN pay the full price for the shell so they (Ben & Kelly) could pay the shell builder.  Well they didn’t pay the shell builder.  Neither did they reimburse DN.  DN have been defrauded of tens of thousands of pounds by a limited liability company with negligible assets.

Victim 5.  WT.   They are the shell builders who accepted the order from Ben Harp Narrowboat Builders Ltd to build the shell for DN.  They haven’t been paid for the shell and have been left with a bespoke boat they will find difficult to sell due to its unique features. 

Victim 6.  NT.  This is the steel fabricator who was duped into modifying our boat.   Ben Harp didn’t tell them we owned the boat and that it was protected by a High Court order.  Not only did they modify our boat but also manufactured doors and hatches at Ben Harp’s request.  Of course they haven’t been paid either!  Ben even told them there might be additional business from him as he was looking for a new shell builder.  Perhaps this isn’t surprising given he had “burned his bridges” with Victim 5.

next – the Lessons

Tuesday 2 August 2011

Ben Harp – To Hell and Back Again – Chapter 8

Was this Attempted Arson?

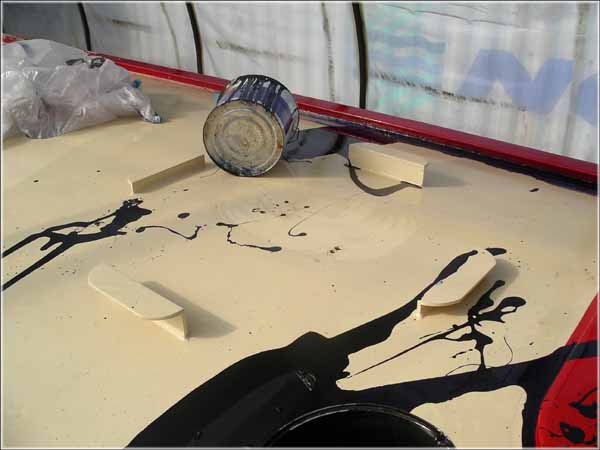
When recovering the boat we noticed these two paint cans on the roof.

You may note both show signs of soot blackening as if they have had a fire in them.

The other can in the first photo was standing upright with what appeared to be residual burned paint in the bottom and on the sides of the interior.  At the time it was suggested to me they may have been lit as a slow burning fuse to set fire to the spilt wet paint.  I doubt the fire would have destroyed the boat but the heat from the burning paint may well have distorted the steelwork.  Anyway; if that was the plan – it didn’t work!

Did readers notice the four angle mounting brackets on the roof of the boat in the first photo above?  They are the mounting brackets for our Camos automatic satellite dome.  The £1600 dome which is part of the £8000 worth of equipment we purchased and supplied to Ben Harp to be fitted to the boat.  Our equipment that has been stolen.

You would have thought Ben Harp would have been intelligent enough to remove these mountings as part of his strategy to conceal the identity of the boat from us!

next:  The other Ben Harp Victims

Monday 1 August 2011

Ben Harp – To Hell and Back Again – Chapter 7

Malicious Damage

[Note: there are a large number of photo’s in this post]

We received word from our solicitors on the afternoon of Thursday 21st July that the Admiralty Court had given us the comprehensive order were requested and immediately started the process of arranging to inspect, identify and remove Waiouru from Ben Harp’s compound at Hixon.

It proved difficult to to arrange a crane and lorry before Monday so everything was arranged to occur early Monday morning.  We had concerns the Harp’s might have already sold our boat and also be preparing to move it.

The Document Server would serve the latest court order on the registered office of Ben Harp at 8:15am and then telephone me.  I had arranged a rendezvous point close to Hixon where I briefed the police, Tim Tyler and the recovery coordinator.  We then moved to Ben Harp’s compound only to find it locked and deserted.  Looking through the fence I could see part of Waiouru in the poly-tunnel and immediately noticed some of the damage.

After opening the gates to the compound we forced entry into the poly-tunnel where Tim Tyler inspected the boat and confirmed to both myself and the police that despite the modifications it was the boat he had built for us.

Almost anything of value had been removed from the compound and Ben Harp never appeared during the time we were present.

This was the interior of Waiouru when we found her on arrival in the UK back in late May.


Certainly not a £91,000 boat.

And this is the interior of Waiouru when we recovered her.  The floor will have to be replaced as the ply isn’t to specification and has delaminated.

The foredeck (cratch area) had been modified

In May the cratch had a locker and fuel tank with a lowered deck and storage underneath.  Ben had a local steel fabricator remove the side lockers and raise the deck.


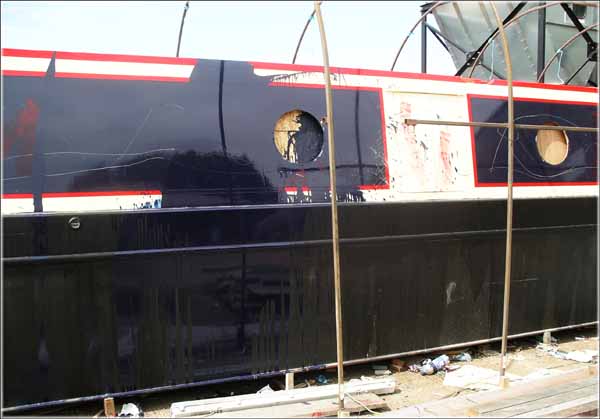
The exterior of Waiouru in May

And now how she looked when we collected her

Poor defaced Waiouru heads for a safe location where she will be lovingly rebuilt!

next:  Was it also attempted arson?